


1. Shading with Surface Normals
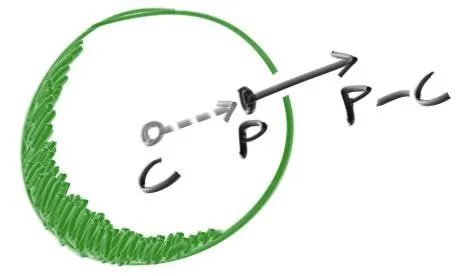
Screen에 표현한 구체에 쉐이딩을 하여 입체감을 주기 위해선 표면에 대한 Normal Vector (법선 벡터, 일명 Normal)가 필요하다. Normal Vector는 표면에서 수직으로 교차하는 Vector라고 생각하면 된다. Normal을 구해내는데 있어서는 단위 길이로 진행할지에 대한 결정이 필요하다. 만일 단위 길이로 진행하게 되면 쉐이딩에 있어서는 편리할 수 있지만, 미묘한 버그를 허용해야 할 수 있다. 구체에서 바깥을 향하는 Normal이라 함은 ray가 닿은 점 에서 중심점 를 뺀 Vector를 의미한다.
위의 Normal을 처리하는 것을 통해서 지구의 중심에서 현재 자기 자신에게 이르는 모든 Vector가 똑바로 위를 가리키고 있다는 것을 암시한다. 여튼 이러한 Normal을 코드에 녹여보자.
아직까지 어떠한 조명을 갖고 있지 않기 떄문에 단순히 Color Map으로만 시각화한다.
Normal을 시각화하는 1가지 트릭은 각 요소들을 과 사이의 값으로 Normalize하여, 를 RGB로 Mapping 시킨다.
만일 이라고 하는 Unit Vector가 있을 때, 이 Vector는 에서 사이의 값을 가지므로 직관적으로 쉽게 변환이 가능하다는 것을 이해하면 된다.
ray가 구체에 닿았든 닿지 않았든 Screen에 ray가 닿은 모든 Pixel에 대해서 Normal이 있어야 쉐이딩이 가능하다. 아직까지 Screen에는 Screen 중앙에 위치한 구체 하나만 존재하고, 이 구체는 카메라 바로 앞에 존재하기 때문에 값이 음수인 (카메라 반대 방향) 상황은 아직 고려하지 않아도 된다. 일단은 가장 작은 (가장 가까운 Hit Point)라고 가정하고 진행한다. Normal은 으로 표기한다.
을 기존 main.cpp에 담아내면 다음과 같다. 기존 hit_sphere 함수는 구체에 닿았는지 닿지 않았는지에 대한 여부만 받으면 됐지만, 수정된 코드에서는 닿은 경우에는 그 수치를 명확히 반환하는 것을 볼 수 있다.
#include "vec3.h"
#include "color.h"
#include "ray.h"
double hit_sphere(const point3& center, double radius, const ray& r)
{
vec3 oc = r.origin() - center;
auto a = dot(r.direction(), r.direction());
auto b = 2.0 * dot(oc, r.direction());
auto c = dot(oc, oc) - radius * radius;
auto discriminant = b * b - 4 * a * c;
if (discriminant < 0)
return (-1.0);
return ((-b - sqrt(discriminant)) / (2.0 * a));
}
color ray_color(const ray& r)
{
auto t = hit_sphere(point3(0, 0, -1), 0.5, r);
if (t > 0.0)
{
vec3 N = unit_vector(r.at(t) - vec3(0, 0, -1));
return (0.5 * color(N.x() + 1, N.y() + 1, N.z() + 1));
}
vec3 unit_direction = unit_vector(r.direction());
t = 0.5 * (unit_direction.y() + 1.0);
return (1.0 - t) * color(1.0, 1.0, 1.0) + t * color(0.5, 0.7, 1.0);
}
int main(void)
{
// Image
const auto aspect_ratio = 16.0 / 9.0;
const int image_width = 400;
const int image_height = static_cast<int>(image_width / aspect_ratio);
// Camera
auto viewport_height = 2.0;
auto viewport_width = aspect_ratio * viewport_height;
auto focal_length = 1.0;
auto origin = point3(0, 0, 0);
auto horizontal = vec3(viewport_width, 0, 0);
auto vertical = vec3(0, viewport_height, 0);
auto lower_left_corner = origin - horizontal / 2 - vertical / 2 - vec3(0, 0, focal_length);
// Render
std::cout << "P3\n" << image_width << ' ' << image_height << "\n255\n";
for (int j = image_height - 1; j >= 0; --j)
{
std::cerr << "\rScanlines Remaining: " << j << ' ' << std::flush;
for (int i = 0; i < image_width; ++i)
{
auto u = double(i) / (image_width - 1);
auto v = double(j) / (image_height - 1);
ray r(origin, lower_left_corner + u * horizontal + v * vertical - origin);
color pixel_color = ray_color(r);
write_color(std::cout, pixel_color);
}
}
std::cerr << "\nDone.\n";
return (0);
}
C++
복사
판별식 가 양수라면 ray가 구체에 닿은 것이므로 에 대해 풀어놓은 2차 방정식의 해를 구해야하는데, ray을 화면 안쪽으로 쏘았기 때문에 양수 값이 필요하다. 따라서 이 경우에는 양수가 되는 값을 이용한다. Normal은 구체 위의 점 에서 구의 중심점인 를 뺀 것이기 때문에 ray가 구체에 닿은 경우 구체 위의 점은 이므로 가 된다. 이 Vector를 Unit Vector로 만들어서 단위 길이의 Normal을 구했다면, Normal을 과 사이의 값으로 Normalize하면 이것이 곧 쉐이딩이 적용된 색상이 된다.

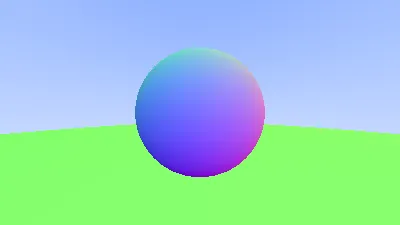
이를 곧 실행하면 아래와 같이 Normal에 따른 쉐이딩이 적용된 구체를 얻을 수 있다.

2. Simplifying the Ray-Sphere Intersection Code
이전에 판별식 가 음수가 아니라면 ray가 구체에 닿은 것이므로, 이 경우에는 2차 방정식의 근인 양수 t값 을 반환하도록 했었다. 여기서 우리가 구해놓은 값을 조금 조정하면, 식을 조금 더 간단한 식으로 변환할 수 있다. (연산을 조금 더 아낄 수 있다.)
기존에 주어진 식은 위와 같이 정리가 가능한데, 이는 계산해놨던 를 로 사용함으로써 가능하다. 기존 식에서의 는 로 사용 했었기 때문에 는 가 된다.
그리고 동일한 값에 대해서 Dot Product을 dot 함수가 아닌 기존에 만들어둔 length_squared라는 함수를 사용하는 것과 동일한 결과를 얻을 수 있다. 따라서 main.cpp를 아래와 같이 변경할 수 있다.
#include "vec3.h"
#include "color.h"
#include "ray.h"
double hit_sphere(const point3& center, double radius, const ray& r)
{
vec3 oc = r.origin() - center;
auto a = r.direction().length_squared();
auto half_b = dot(oc, r.direction());
auto c = oc.length_squared() - radius * radius;
auto discriminant = half_b * half_b - a * c;
if (discriminant < 0)
return (-1.0);
return ((-half_b - sqrt(discriminant)) / a);
}
color ray_color(const ray& r)
{
auto t = hit_sphere(point3(0, 0, -1), 0.5, r);
if (t > 0.0)
{
vec3 N = unit_vector(r.at(t) - vec3(0, 0, -1));
return (0.5 * color(N.x() + 1, N.y() + 1, N.z() + 1));
}
vec3 unit_direction = unit_vector(r.direction());
t = 0.5 * (unit_direction.y() + 1.0);
return (1.0 - t) * color(1.0, 1.0, 1.0) + t * color(0.5, 0.7, 1.0);
}
int main(void)
{
// Image
const auto aspect_ratio = 16.0 / 9.0;
const int image_width = 400;
const int image_height = static_cast<int>(image_width / aspect_ratio);
// Camera
auto viewport_height = 2.0;
auto viewport_width = aspect_ratio * viewport_height;
auto focal_length = 1.0;
auto origin = point3(0, 0, 0);
auto horizontal = vec3(viewport_width, 0, 0);
auto vertical = vec3(0, viewport_height, 0);
auto lower_left_corner = origin - horizontal / 2 - vertical / 2 - vec3(0, 0, focal_length);
// Render
std::cout << "P3\n" << image_width << ' ' << image_height << "\n255\n";
for (int j = image_height - 1; j >= 0; --j)
{
std::cerr << "\rScanlines Remaining: " << j << ' ' << std::flush;
for (int i = 0; i < image_width; ++i)
{
auto u = double(i) / (image_width - 1);
auto v = double(j) / (image_height - 1);
ray r(origin, lower_left_corner + u * horizontal + v * vertical - origin);
color pixel_color = ray_color(r);
write_color(std::cout, pixel_color);
}
}
std::cerr << "\nDone.\n";
return (0);
}
C++
복사
3. An Abstraction for Hittable Objects
현재까지 진행된 코드는 단일 구체에 대해서만 ray를 처리했다. 하지만 만일 여러 개의 구체를 표현하고 싶다면 이를 어떻게 나타내면 좋을까? 여러 개의 구체를 배열로써 유지하고 싶은 유혹이 들겠지만, 깔끔한 해결책은 ray와 부딪힐 수 있는 모든 Object들을 추상화하여 Abstract Class로 유지하는 것이다. 이렇게 Class를 두는 것이 객체 지향의 시작이라고 볼 수 있다.
우선 구현하려는 Object의 이름을 둬야 하는데 Volume을 원할 수도 있으니 종종 사용되기도하는 이름인 surface보다는 hittable이라고 두자. hittable이라고 하는 Abstract Class는 내부적으로 hit 함수를 갖고 있다. hit 함수에 대해서 조금 더 살펴보면, 충돌에 유효한 범위인 과 를 두는 것이 좋으며 실제로 대부분의 Ray Tracer들 역시 이렇게 두어 편리하게 사용하는 것을 알 수 있다. 따라서 충돌의 범위가 주어졌기 때문에 가 라면 충돌로 처리한다.
마지막으로 디자인적인 관점에서의 결정 사항이 필요한데, 만일 ray가 Object에 닿았다면 Nomal을 계산할지에 대한 것이다. 현재 우리의 경우에는 ray를 쏘아 Object에 닿는 것을 탐색할 때, 가장 먼저 부딪히는 곳에 대한 Normal만 있으면 되므로 Normal을 저장할 수 있는 hit_record라는 구조체를 두면 되겠다.
Abstract Class인 hittable은 아래와 같이 hittable.h에 정의한다.
#ifndef HITTABLE_H
# define HITTABLE_H
#include "ray.h"
struct hit_record
{
point3 p;
vec3 normal;
double t;
};
class hittable
{
public:
virtual bool hit(const ray& r, double t_min, double t_max, hit_record& rec) const = 0;
};
#endif
C++
복사
위와 같이 hittable이라고 하는 Class를 만들었다면, 이를 상속받아 정의된 sphere라는 Class를 아래와 같이 sphere.h에 정의한다.
#ifndef SPHERE_H
# define SPHERE_H
# include "hittable.h"
# include "vec3.h"
class sphere : public hittable
{
public:
sphere() {}
sphere(point3 cen, double r) : center(cen), radius(r) {}
virtual ~sphere() {}
virtual bool hit(const ray& r, double t_min, double t_max, hit_record& rec) const override;
public:
point3 center;
double radius;
};
bool sphere::hit(const ray& r, double t_min, double t_max, hit_record& rec) const
{
vec3 oc = r.origin() - center;
auto a = r.direction().length_squared();
auto half_b = dot(oc, r.direction());
auto c = oc.length_squared() - radius * radius;
auto discriminant = half_b * half_b - a * c;
if (discriminant < 0)
return (false);
auto sqrtd = sqrt(discriminant);
// Find the nearest root that lies in the accpetable range.
auto root = (-half_b - sqrtd) / a;
if (root < t_min || t_max < root)
{
root = (-half_b + sqrtd) / a;
if (root < t_min || t_max < root)
return (false);
}
rec.t = root;
rec.p = r.at(rec.t);
rec.normal = (rec.p - center) / radius;
return (true);
}
#endif
C++
복사
4. Front Faces Versus Back Faces
이번 Chapter에서 가장 먼저 다뤘던 부분을 보면, Normal에 대해서 구할 때 단위 길이로 구할지에 대한 결정이 필요하다고 했다. 여기에 추가적으로 Normal이 향하는 방향을 Object의 어느 쪽으로 할 것인지 결정해야 한다. 그 이유는 ray의 방향을 기준으로 Object가 빛을 받는 면인지 (앞), 빛을 받지 않는 면인지 (뒤)를 구분하는데 있어서 중요하기 때문이다.
우선 현재 작업 중인 Ray Tracer에서의 Normal은 구의 중심에서부터 ray가 교차되는 점까지의 방향이기 때문에 Object의 바깥을 향하게 된다.
Normal의 방향이 정해졌다면 Object의 앞과 뒤를 구분하는데 있어서 ray와 Normal의 같은 방향을 향하는지가 중요하다. 위 경우대로라면 두 방향이 서로 같은 방향일 때 곧 Object의 뒷 면을 의미하고, 서로 다른 방향일 때 Object의 앞 면을 의미하기 때문이다.
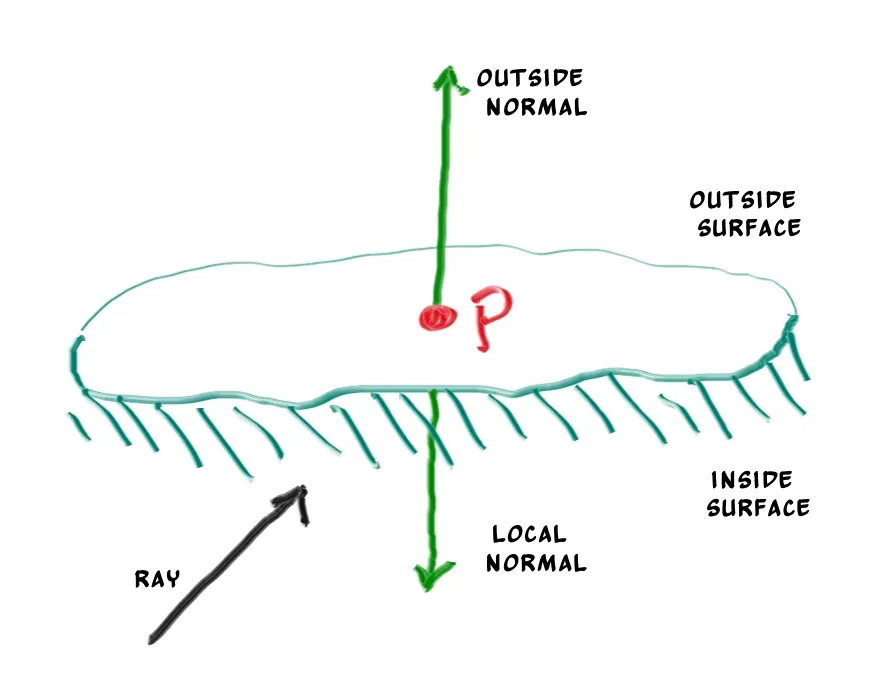
이렇게 Normal의 방향에 따라 Object의 앞과 뒤를 구분하는 것이 중요한 이유는 종이 혹은 유리잔과 같이 양면으로 된 Object를 구현할 때 주요하기 때문이다.
그렇다면 위에서 밝힌 것처럼 Normal과 ray가 서로 같은 방향인지 판별하는 것이 중요한데, 어떻게 두 Vector가 교차하는지 알 수 있을까? 해답은 Dot Product에 존재한다. 두 Vector의 Dot Product이 보다 크다면 이는 곧 뒷 면을, 보다 작으면 앞 면을 의미하게 된다.
이를 간단한 코드로 나타내면 다음과 같다.
bool front_face;
if (dot(ray_direction, outward_normal) > 0.0)
{
// ray is inside the sphere
normal = -outward_normal;
front_face = false;
} else
{
// ray is outside the sphere
normal = outward_normal;
front_face = true;
}
C++
복사
코드에서 나타난 front_face라는 변수를 hit_record라는 구조체에 추가함으로써 Object에 닿은 곳이 앞 면인지 뒷 면인지 기록해둘 수 있다. 수정된 hit_record는 아래와 같다.
#ifndef HITTABLE_H
# define HITTABLE_H
#include "ray.h"
struct hit_record
{
point3 p;
vec3 normal;
double t;
bool front_face;
inline void set_face_normal(const ray& r, const vec3& outward_normal)
{
front_face = dot(r.direction(), outward_normal) < 0;
normal = front_face ? outward_normal : -outward_normal;
}
};
class hittable
{
public:
virtual bool hit(const ray& r, double t_min, double t_max, hit_record& rec) const = 0;
};
#endif
C++
복사
수정된 hittable.h에 따라 구체의 hit 함수에서 hit_record를 기록하는 부분을 front_face 저장 및 기존 normal에 face_normal을 저장하도록 나타내면 다음과 같다.
#ifndef SPHERE_H
# define SPHERE_H
# include "hittable.h"
# include "vec3.h"
class sphere : public hittable
{
public:
sphere() {}
sphere(point3 cen, double r) : center(cen), radius(r) {}
virtual ~sphere() {}
virtual bool hit(const ray& r, double t_min, double t_max, hit_record& rec) const override;
public:
point3 center;
double radius;
};
bool sphere::hit(const ray& r, double t_min, double t_max, hit_record& rec) const
{
vec3 oc = r.origin() - center;
auto a = r.direction().length_squared();
auto half_b = dot(oc, r.direction());
auto c = oc.length_squared() - radius * radius;
auto discriminant = half_b * half_b - a * c;
if (discriminant < 0)
return (false);
auto sqrtd = sqrt(discriminant);
// Find the nearest root that lies in the accpetable range.
auto root = (-half_b - sqrtd) / a;
if (root < t_min || t_max < root)
{
root = (-half_b + sqrtd) / a;
if (root < t_min || t_max < root)
return (false);
}
rec.t = root;
rec.p = r.at(rec.t);
vec3 outward_normal = (rec.p - center) / radius;
rec.set_face_normal(r, outward_normal);
return (true);
}
#endif
C++
복사
5. A List of Hittable Objects
Object는 ray에 hit될 수 있으므로 이런 Object를 hittable로 구현했었다. Projection Space에서 Object가 하나가 아닌 여럿 있을 수 있기 때문에 다수의 hittable 객체를 관리할 수 있는 Class가 필요하다. 이를 hittable_list라 하고 아래와 같이 hittable_list.h로 작성한다.
#ifndef HITTABLE_LIST_H
# define HITTABLE_LIST_H
# include "hittable.h"
# include <memory>
# include <vector>
using std::shared_ptr;
using std::make_shared;
class hittable_list : public hittable
{
public:
hittable_list() {}
hittable_list(shared_ptr<hittable> object) { add(object); }
void clear() { objects.clear(); }
void add(shared_ptr<hittable> object) { objects.push_back(object); }
virtual bool hit(const ray& r, double t_min, double t_max, hit_record& rec) const override;
public:
std::vector<shared_ptr<hittable>> objects;
};
bool hittable_list::hit(const ray& r, double t_min, double t_max, hit_record& rec) const
{
hit_record temp_rec;
bool hit_anything = false;
auto closest_so_far = t_max;
for (const auto& object : objects)
{
if (object->hit(r, t_min, closest_so_far, temp_rec))
{
hit_anything = true;
closest_so_far = temp_rec.t;
rec = temp_rec;
}
}
return (hit_anything);
}
#endif
C++
복사
6. Some New C++ Features
위에서 작성한 hittable_list.h는 C++에서의 2가지 특성을 이용한다. C++을 이용하지 않는다면 잘 모를 수도 있는데, 바로 vector와 shared_ptr이라는 것들이다.
C++은 template이라는 것을 이용한 제네릭 프로그래밍이 가능하다. 즉 type을 지칭하는 것을 T라고 한다면, Class 혹은 Function에 대해서 다양한 타입을 이용할 수 있도록 T를 통해 구현이 가능하다. 위에서 제시된 vector와 shared_ptr 역시 Class인데, 이들도 template을 이용하여 구현이 되어 있다. shared_ptr을 예로, 해당 Class에 대한 객체를 만들 때는 shared_ptr<T>처럼 나타낼 수 있고 T라는 타입에 대한 shared_ptr을 의미한다.
template에 대한 소개가 간단히 끝났으니 각 키워드에 대해서 알아보자.
참고로 using이라는 키워드를 이용하여 std::vector와 std::shared_ptr이라고 기록해뒀는데, 이를 통해 std라는 Namespace에 존재하는 해당 객체들을 사용할 것이라고 컴파일러에게 알리게 된다. 따라서 vector 및 shared_ptr을 이용할 때 매번 앞에 반복적으로 std::를 붙일 필요가 없는 것이다.
1) shared_ptr
shared_ptr<T>은 할당 받은 타입 T에 대한 포인터이며, Reference Couting이라는 의미를 지닌다. 단순 할당 구문을 이용하는 것과 같이 shared_ptr에 특정 값을 할당을 하게 되면, 내부적으로 관리하는 참조 횟수가 증가하는 방식으로 작동된다. 만일 블록 밖을 나가거나 함수의 종료로 인해 shared_ptr의 Scope를 벗어나게 되면, 참조 횟수가 다시 감소하게 된다. 만일 참조 횟수가 0이 되어버리면, shared_ptr을 이용하고 있는 객체는 소멸자를 호출하여 자동으로 메모리 상에서 소멸된다. 일반적으로 shared_ptr은 아래와 같이 새롭게 할당되는 객체에 대해서 초기화를 하게 된다.

Reference Counting
Reference Counting은 컴퓨터 사이언스에서 사용되는 기법 중 하나인데, 참조자 혹은 포인터에 의해 발생한 참조에 대한 횟수를 저장하여 공유되고 있는 자원 (객체, 메모리 공간, 디스크 공간 등)을 관리하기 쉽도록 만든다. Garbage Collection을 구현하는 알고리즘에서 사용하지 않는 공간에 대해 해제하기 위해서 주로 쓰이는 기법이다.
shared_ptr<double> double_ptr = make_shared<double>(0.37);
shared_ptr<vec3> vec3_ptr = make_shared<vec3>(1.414214, 2.718281, 1.618034);
shared_ptr<sphere> sphere_ptr = make_shared<sphere>(point3(0, 0, 0), 1.0);
C++
복사
초기화 구문을 보면 알 수 있듯이, 초기화에는 shared_ptr 생성자 함수를 사용할 수도 있지만 주로 make_shared라고 하는 shared_ptr 객체를 반환해주는 함수를 이용하여 초기화를 진행한다.
make_shared라는 함수의 정의는 다음과 같다. 아래를 보면 enable_if를 활용한 Template Meta Programming으로 원형이 정의된 것을 확인할 수 있는데, 이에 대해서 이해는 별도로 자료를 찾아보길 바라며 그 이후에 정의된 원형 자체만 간단히 둘러보길 바란다.
template<class _Tp, class ..._Args>
inline _LIBCPP_INLINE_VISIBILITY
typename enable_if
<
!is_array<_Tp>::value,
shared_ptr<_Tp>
>::type
make_shared(_Args&& ...__args)
{
static_assert(is_constructible<_Tp, _Args...>::value, "Can't construct object in make_shared");
typedef __shared_ptr_emplace<_Tp, allocator<_Tp> > _CntrlBlk;
typedef allocator<_CntrlBlk> _A2;
typedef __allocator_destructor<_A2> _D2;
_A2 __a2;
unique_ptr<_CntrlBlk, _D2> __hold2(__a2.allocate(1), _D2(__a2, 1));
::new(__hold2.get()) _CntrlBlk(__a2, _VSTD::forward<_Args>(__args)...);
_Tp *__ptr = __hold2.get()->get();
return shared_ptr<_Tp>::__create_with_control_block(__ptr, __hold2.release());
}
C++
복사
즉, 원형 자체를 간단하게 보면 아래와 같고, 함수에 주어진 인자가 곧 생성자 함수의 인자로 들어가면서 타입 thing 객체를 생성하게 된다.
make_shared<thing>(thing_constructor_params ...)
C++
복사
make_shared라는 함수 자체가 갖는 반환 타입 덕분에 auto라는 키워드를 통해 타입을 추론하게 할 수 있다. 따라서 기존에 작성한 예제들을 조금 더 줄여서 표현이 가능하다.
auto double_ptr = make_shared<double>(0.37);
auto vec3_ptr = make_shared<vec3>(1.414214, 2.718281, 1.618034);
auto sphere_ptr = make_shared<sphere>(point3(0, 0, 0), 1.0);
C++
복사
Projection Space에는 단순히 하나의 Object만 존재하는 것이 아니라, 다수의 Object가 존재할 수 있는데 이에 대해서 hittable_list로 구현했고 내부적으로 shared_ptr을 이용하고 있다. 그 이유는 다수의 기하 구조들이 공통 객체를 공유할 수도 있기 때문이다. 현재는 ray가 하나지만, Texture Map Material에 따라서 그 ray가 여럿이 진행되어 객체를 여럿 공유할 수도 있기 때문이다. 이에 대해서 공유되고 있는 공통적인 객체에 대해 메모리를 자동으로 관리하기 쉽기 때문에 shared_ptr을 이용한다. 현재 사용하고 있는 shared_ptr은 std라고하는 Namespace에 존재한다. std::shared_ptr은 memory라고 하는 Header에 존재한다.
2) vector
vector 역시 shared_ptr과 마찬가지로 std라고 하는 Namespace에 존재한다. vector는 임의의 타입에 대해서 배열과 같이 동작하는 제네릭한 Collection이다. 우리는 hittable_list를 정의할 때 hittable 객체를 shared_ptr로 이용하면서, 이를 vector라는 Collection에 두었었다. 이를 통해 Collection에 새로운 객체를 추가할 때는 push_back이라는 함수를 통해서 쉽게 해결할 수 있었다. push_back이라는 함수를 이용하면 인자로 받은 객체를 Collection에 추가하게 되는데, 추가 시에는 vector의 제일 마지막에 위치시킨다.
7. Common Constants and Utility Functions
기존에 작성했던 코드들에 있어서 수학적으로 상수를 Header 내에 몇 개를 정해둠으로써 편리하게 사용할 수 있다. 현재로써는 무한대를 표기하는 infinity 혹은 pi등이 있겠다. 이러한 상수를 rtweekend.h에 정의해보자.
#ifndef RTWEEKEND_H
# define RTWEEKEND_H
# include <cmath>
# include <limits>
# include <memory>
// Usings
using std::shared_ptr;
using std::make_shared;
using std::sqrt;
// Constants
const double infinity = std::numeric_limits<double>::infinity();
const double pi = 3.1415926535897932385;
// Utility Functions
inline double degrees_to_radians(double degrees)
{
return (degrees * pi / 180.0);
}
// Common Headers
# include "ray.h"
# include "vec3.h"
#endif
C++
복사
이번 Chapter에서 새롭게 정의한 여러 Header들이 존재하는데 이들을 모두 이용하여 main.cpp를 수정해보자.
#include "rtweekend.h"
#include "color.h"
#include "hittable_list.h"
#include "sphere.h"
#include <iostream>
color ray_color(const ray& r, const hittable& world)
{
hit_record rec;
if (world.hit(r, 0, infinity, rec))
return (0.5 * (rec.normal + color(1, 1, 1)));
vec3 unit_direction = unit_vector(r.direction());
auto t = 0.5 * (unit_direction.y() + 1.0);
return (1.0 - t) * color(1.0, 1.0, 1.0) + t * color(0.5, 0.7, 1.0);
}
int main(void)
{
// Image
const auto aspect_ratio = 16.0 / 9.0;
const int image_width = 400;
const int image_height = static_cast<int>(image_width / aspect_ratio);
// World
hittable_list world;
world.add(make_shared<sphere>(point3(0, 0, -1), 0.5));
world.add(make_shared<shpere>(point3(0, -100.5, -1), 100));
// Camera
auto viewport_height = 2.0;
auto viewport_width = aspect_ratio * viewport_height;
auto focal_length = 1.0;
auto origin = point3(0, 0, 0);
auto horizontal = vec3(viewport_width, 0, 0);
auto vertical = vec3(0, viewport_height, 0);
auto lower_left_corner = origin - horizontal / 2 - vertical / 2 - vec3(0, 0, focal_length);
// Render
std::cout << "P3\n" << image_width << ' ' << image_height << "\n255\n";
for (int j = image_height - 1; j >= 0; --j)
{
std::cerr << "\rScanlines Remaining: " << j << ' ' << std::flush;
for (int i = 0; i < image_width; ++i)
{
auto u = double(i) / (image_width - 1);
auto v = double(j) / (image_height - 1);
ray r(origin, lower_left_corner + u * horizontal + v * vertical - origin);
color pixel_color = ray_color(r, world);
write_color(std::cout, pixel_color);
}
}
std::cerr << "\nDone.\n";
return (0);
}
C++
복사

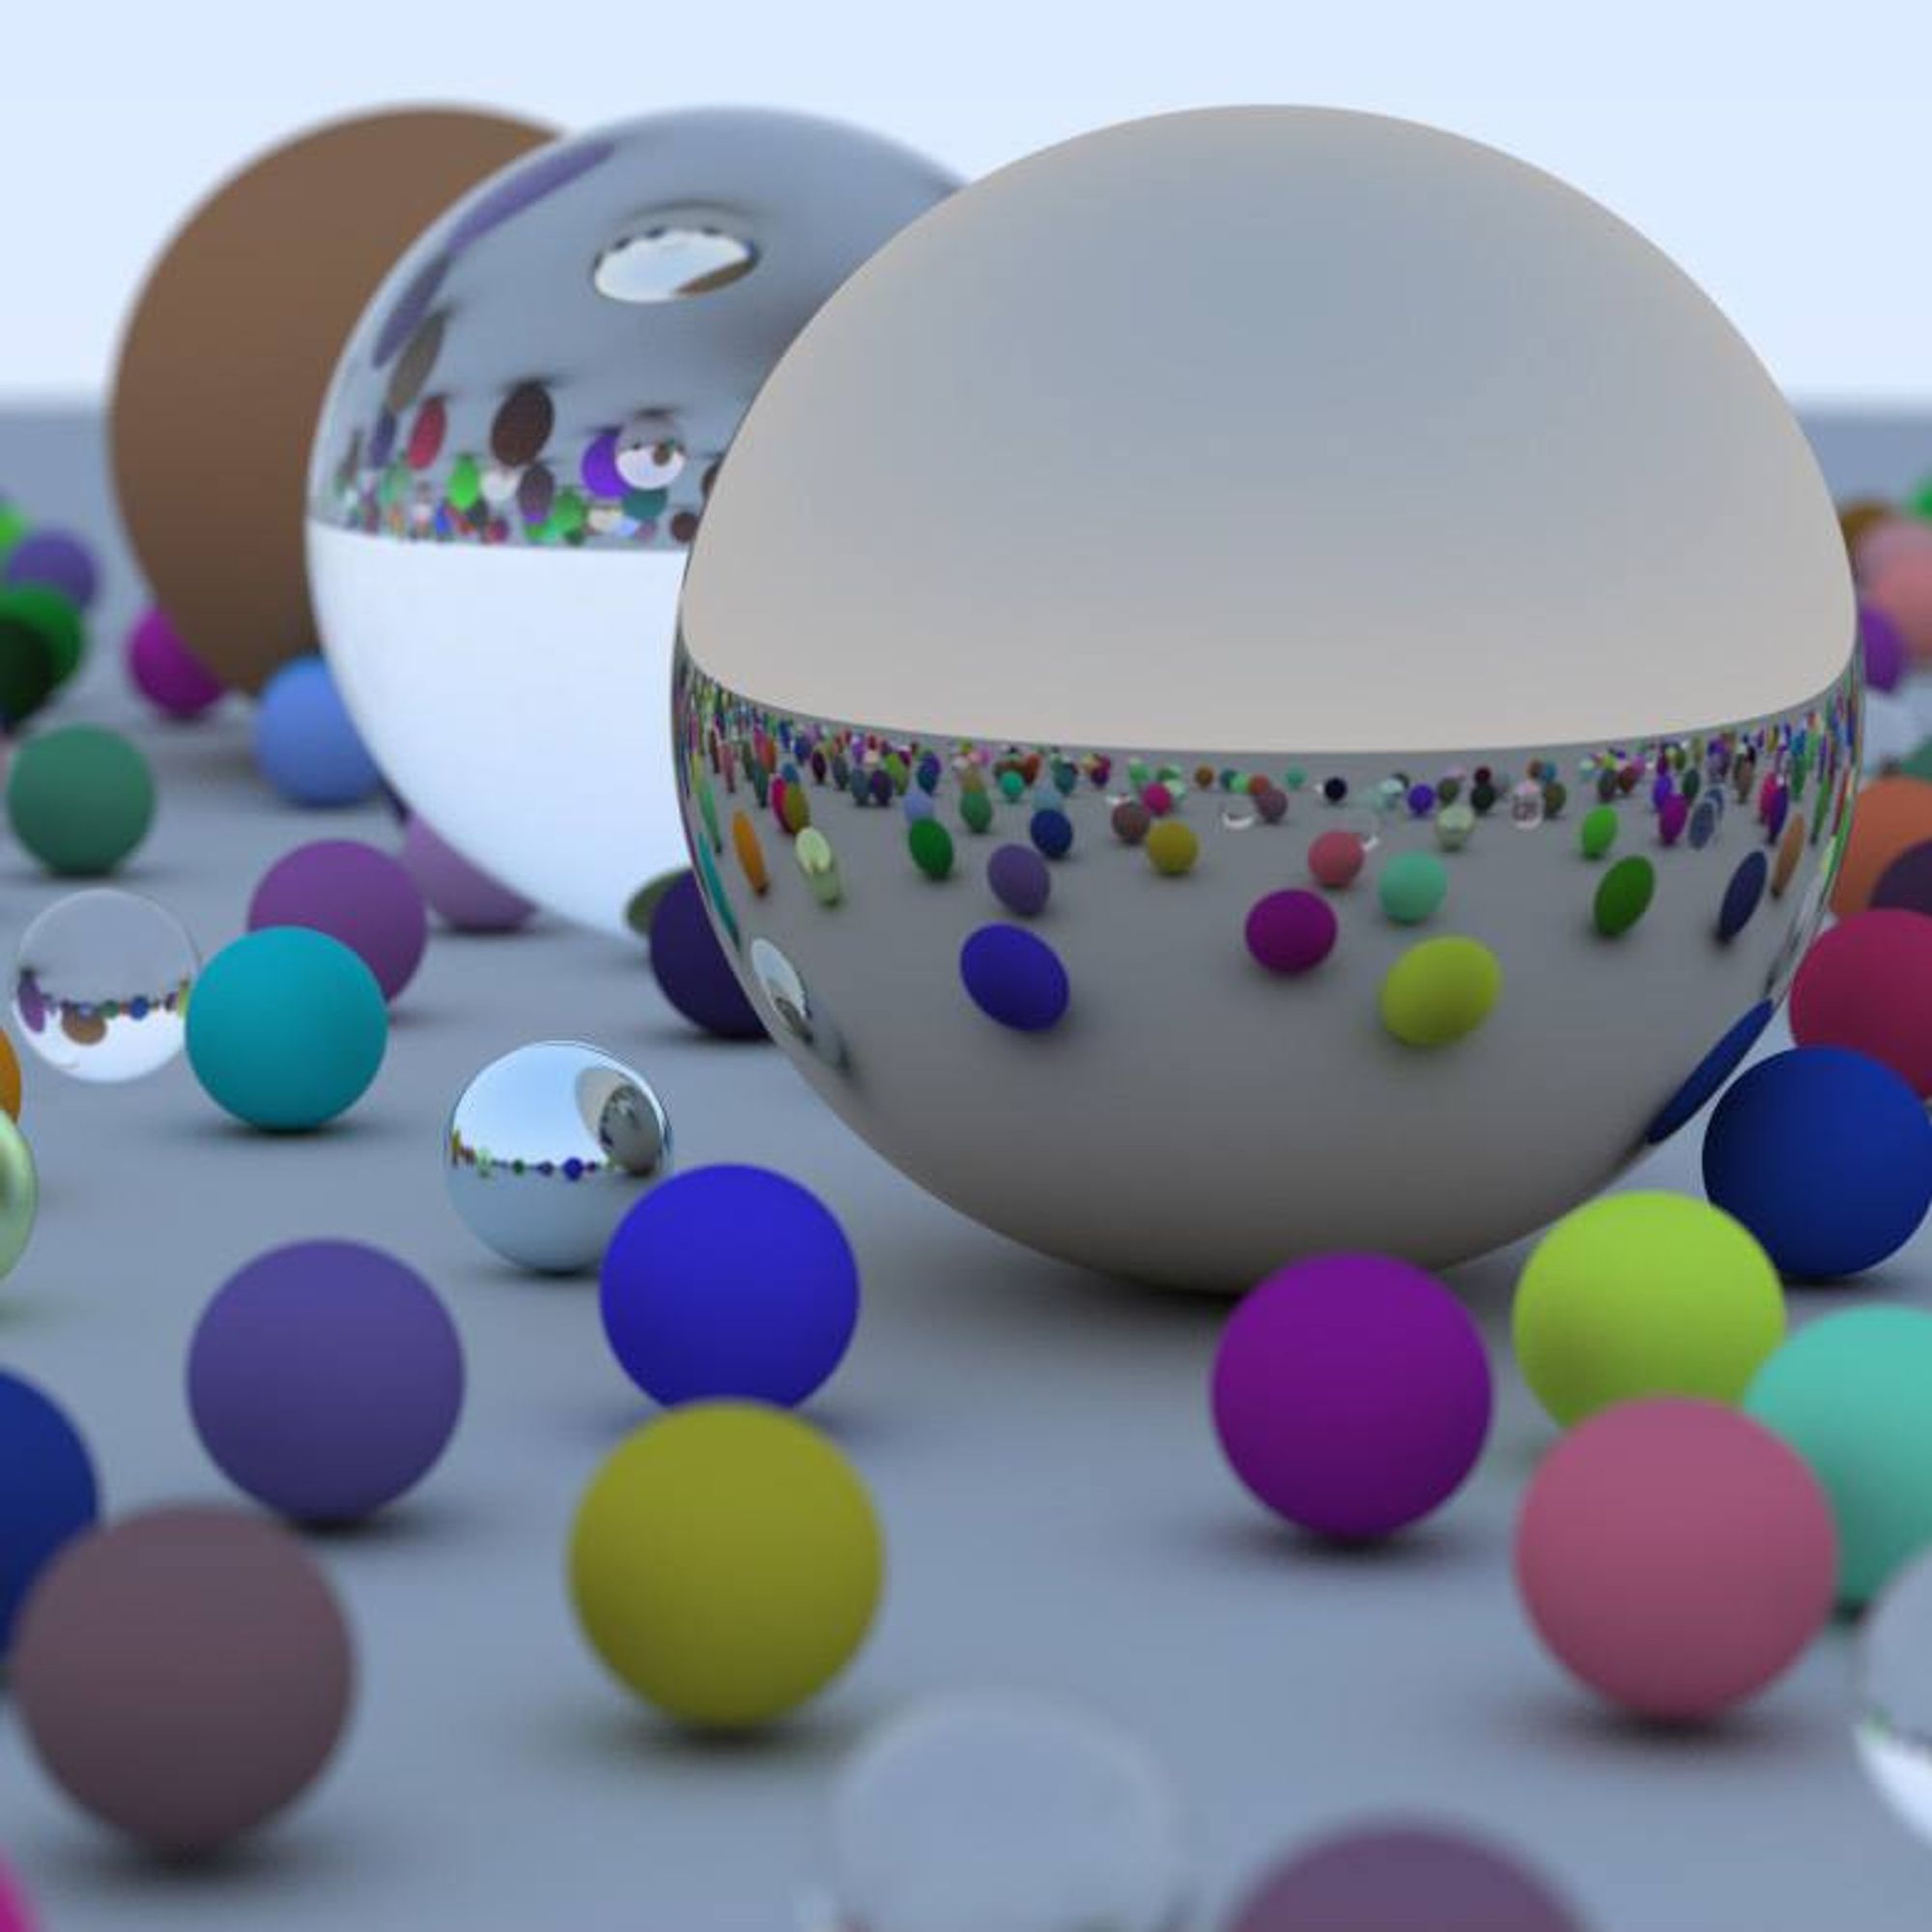
main.cpp를 수정한 코드를 실행하면 위와 같이 실행하면 아래와 같은 그림을 얻을 수 있다.