

유전체의 굴절광을 디버깅하는 것과 마찬가지로 카메라 역시 디버깅에 애를 많이 먹는다. 따라서 단계별로 완성 시켜보자. 첫 째로, FOV (Field of View)를 적용해보자. FOV라는 것은 시야각을 의미한다. 우리가 바라보는 Image가 정사각형이 아니기 때문에, FOV는 수직으로 봤을 때와 수평으로 봤을 때 다르다. 여기서는 Vertical FOV (수직 시야각)을 이용할 것이다. 또한 수직 시야각을 이용하면서 명시된 각도를 Class의 생성자 함수에 인자로 넣어 Radian으로 바꾸어 이용할 것이다. (물론 이에 대한 것은 정답이 있는 것은 아니므로 개인에 맞게 구현해도 좋다.)
1. Camera Viewing Geometry
지금까지 ray는 원점에서 시작하여 평면에 닿도록 만들어뒀다. 우리는 거리에 따른 비율 를 이용한다면, 혹은 그 어떤 평면에 있더라도 문제가 없다. 아래와 같은 그림으로 를 둘 것이다.
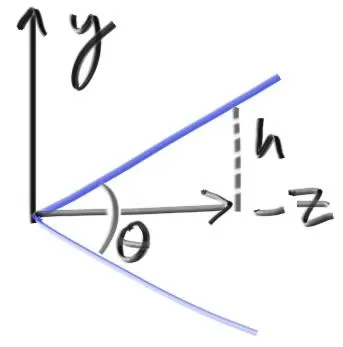
위에 제시된 그림에 따라 를 아래와 같이 둘 수 있다.
이에 따라 camera.h에 정의한 camera에 이를 반영할 수 있다. 코드는 아래와 같다.
#ifndef CAMERA_H
# define CAMERA_H
# include "rtweekend.h"
class camera
{
public:
camera(double vfov, double aspect_ratio)
{
auto theta = degrees_to_radians(vfov);
auto h = tan(theta / 2);
auto viewport_height = 2.0 * h;
auto viewport_width = aspect_ratio * viewport_height;
auto focal_length = 1.0;
origin = point3(0, 0, 0);
horizontal = vec3(viewport_width, 0, 0);
vertical = vec3(0, viewport_height, 0);
lower_left_corner = origin - horizontal / 2 - vertical / 2 - vec3(0, 0, focal_length);
}
ray get_ray(double u, double v) const
{
return ray(origin, lower_left_corner + u * horizontal + v * vertical - origin);
}
private:
point3 origin;
point3 lower_left_corner;
vec3 horizontal;
vec3 vertical;
};
#endif
C++
복사
camera 객체가 수직 싱챠각과 종횡비를 인자로 받도록 설정 되었기 때문에 main.cpp의 camera 객체도 이에 맞춰서 생성할 수 있도록 코드를 수정한다.
#include "rtweekend.h"
#include "color.h"
#include "hittable_list.h"
#include "sphere.h"
#include "camera.h"
#include "vec3.h"
#include "material.h"
#include <iostream>
color ray_color(const ray& r, const hittable& world, int depth)
{
hit_record rec;
// If we've exceeded the ray bound limit, no more light is gathered.
if (depth <= 0)
return (color(0, 0, 0));
if (world.hit(r, 0.001, infinity, rec))
{
ray scattered;
color attenuation;
if (rec.mat_ptr->scatter(r, rec, attenuation, scattered))
return (attenuation * ray_color(scattered, world, depth - 1));
return (color(0, 0, 0));
}
vec3 unit_direction = unit_vector(r.direction());
auto t = 0.5 * (unit_direction.y() + 1.0);
return (1.0 - t) * color(1.0, 1.0, 1.0) + t * color(0.5, 0.7, 1.0);
}
int main(void)
{
// Image
const auto aspect_ratio = 16.0 / 9.0;
const int image_width = 400;
const int image_height = static_cast<int>(image_width / aspect_ratio);
const int samples_per_pixel = 100;
const int max_depth = 50;
// World
auto R = cos(pi / 4);
hittable_list world;
auto material_left = make_shared<lambertian>(color(0, 0, 1));
auto material_right = make_shared<lambertian>(color(1, 0, 0));
world.add(make_shared<sphere>(point3(-R, 0.0, -1.0), R, material_left));
world.add(make_shared<sphere>(point3(R, 0.0, -1.0), R, material_right));
// Camera
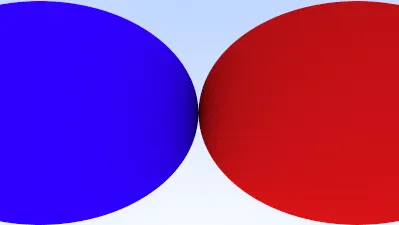
camera cam(90.0, aspect_ratio);
// Render
std::cout << "P3\n" << image_width << ' ' << image_height << "\n255\n";
for (int j = image_height - 1; j >= 0; --j)
{
std::cerr << "\rScanlines Remaining: " << j << ' ' << std::flush;
for (int i = 0; i < image_width; ++i)
{
color pixel_color(0, 0, 0);
for (int s = 0; s < samples_per_pixel; ++s)
{
auto u = (i + random_double()) / (image_width - 1);
auto v = (j + random_double()) / (image_height - 1);
ray r = cam.get_ray(u, v);
pixel_color += ray_color(r, world, max_depth);
}
write_color(std::cout, pixel_color, samples_per_pixel);
}
}
std::cerr << "\nDone.\n";
return (0);
}
C++
복사

수정된 코드를 실행하면 아래와 같이 Wide-Angle View로 구체 2개를 볼 수 있다.
2. Positioning and Orienting the Camera
임의의 시점을 얻기 위해서, 우리는 얻고자 하는 지점에 대해 명명해보자. 우리는 Object를 바라볼 수 있도록 카메라를 둔 곳을 lookfrom, 카메라가 바라보는 지점을 lookat이라고 하자. (lookat이라는 점 대신에 카메라를 둔 곳에서의 방향으로 이용할 수도 있다. 이렇게 이용하고 싶다면 lookfrom과 lookat의 설명을 듣고 Vector로써 표현해보자.)
이번 Chapter의 가장 첫 부분이 FOV를 이용한 확대 및 축소를 구현했다면 이번에는 카메라가 Roll (얼마나 돌아가 있고), Tilt(얼마나 기울었는지)에 따라 Image에 이를 반영하도록 구현할 것이다. Roll과 Tilt는 lookat-lookfrom으로 된 축이 Rotation을 한 것임을 명심해야 한다. 이 때 주의해야 하는 것이 Rotation에 대한 시뮬레이션인데, 머리 (lookfrom)와 코 (lookat)의 지점이 일정하면 머리를 회전했을 때 코도 함께 움직인다는 것을 고려해야 한다. 이는 camera의 윗 방향을 의미하는 Up-Vector를 이용하면 쉽게 해결할 수 있다. Up-Vector는 바라보는 방향 (lookfrom to lookat)에 수직인 평면 상에 있어야 한다. (이 평면 상에만 있다면 어떤 Up-Vector를 써도 무방하다.)

결정된 Up-Vector는 관례적으로 View Up (Vup) Vector 라고 부른다. 이 때, 카메라의 방향과 Vup Vector가 수직이기 때문에 Cross Product을 통해 각각 수직으로 이뤄진 축 를 얻을 수 있다.
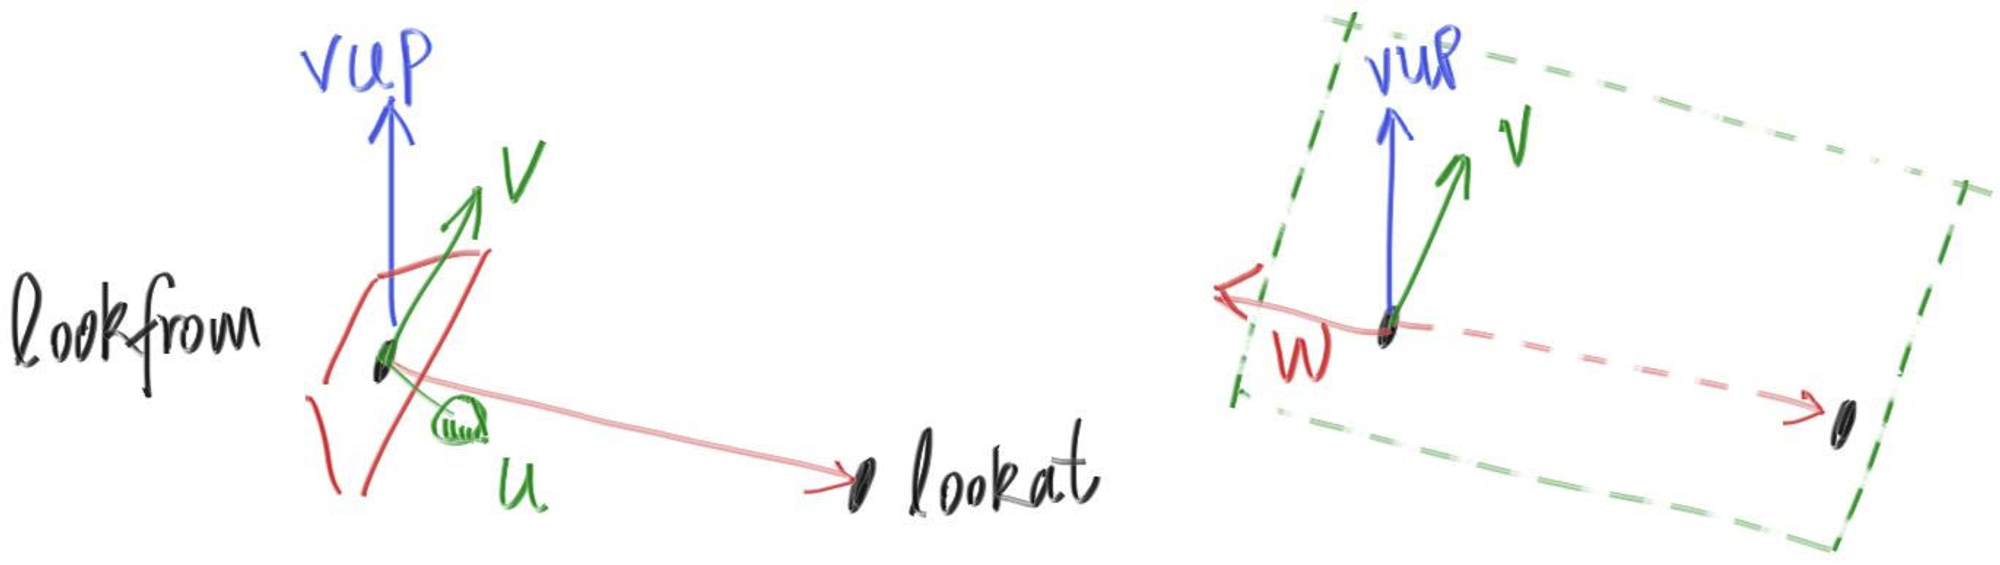
Vup Vector를 고려했을 때, v와 w는 한 평면 상에 있다는 것을 명심해야 한다. 그리고 이전에 카메라를 에 고정해놨던 것처럼, 결정된 공간에서 카메라는 를 향하고 있다는 것도 명심해야 한다. 마지막으로 필수는 아니지만 Vup Vector를 명시하기 위해서 world의 윗 방향인 을 이용할 것이다. Vup Vector를 이렇게 설정해두면, 우리가 사용하려는 카메라의 각도를 설정하기 전까진 자연스레 수평을 이룬 채로 쓸 수 있어 편리하다.
카메라의 Roll과 Tilt를 나타내기 위해 새로운 기준 를 둬야하고 이를 Vup Vector를 이용해서 구할 것이므로 수정된 camera.h는 아래와 같다.
#ifndef CAMERA_H
# define CAMERA_H
# include "rtweekend.h"
class camera
{
public:
camera(point3 lookfrom, point3 lookat, vec3 vup, double vfov, double aspect_ratio)
{
auto theta = degrees_to_radians(vfov);
auto h = tan(theta / 2);
auto viewport_height = 2.0 * h;
auto viewport_width = aspect_ratio * viewport_height;
auto w = unit_vector(lookfrom - lookat);
auto u = unit_vector(cross(vup, w));
auto v = cross(w, u);
origin = lookfrom;
horizontal = viewport_width * u;
vertical = viewport_height * v;
lower_left_corner = origin - horizontal / 2 - vertical / 2 - w;
}
ray get_ray(double s, double t) const
{
return ray(origin, lower_left_corner + s * horizontal + t * vertical - origin);
}
private:
point3 origin;
point3 lower_left_corner;
vec3 horizontal;
vec3 vertical;
};
#endif
C++
복사
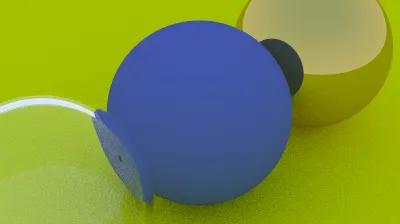
Wide-Angle View를 위해 2개의 Object만 두었던 world에 다시 Object를 추가해보자. main.cpp는 아래와 같다.
#include "rtweekend.h"
#include "color.h"
#include "hittable_list.h"
#include "sphere.h"
#include "camera.h"
#include "vec3.h"
#include "material.h"
#include <iostream>
color ray_color(const ray& r, const hittable& world, int depth)
{
hit_record rec;
// If we've exceeded the ray bound limit, no more light is gathered.
if (depth <= 0)
return (color(0, 0, 0));
if (world.hit(r, 0.001, infinity, rec))
{
ray scattered;
color attenuation;
if (rec.mat_ptr->scatter(r, rec, attenuation, scattered))
return (attenuation * ray_color(scattered, world, depth - 1));
return (color(0, 0, 0));
}
vec3 unit_direction = unit_vector(r.direction());
auto t = 0.5 * (unit_direction.y() + 1.0);
return (1.0 - t) * color(1.0, 1.0, 1.0) + t * color(0.5, 0.7, 1.0);
}
int main(void)
{
// Image
const auto aspect_ratio = 16.0 / 9.0;
const int image_width = 400;
const int image_height = static_cast<int>(image_width / aspect_ratio);
const int samples_per_pixel = 100;
const int max_depth = 50;
// World
hittable_list world;
auto material_ground = make_shared<lambertian>(color(0.8, 0.8, 0.0));
auto material_center = make_shared<lambertian>(color(0.1, 0.2, 0.5));
auto material_left = make_shared<dielectric>(1.5);
auto material_right = make_shared<metal>(color(0.8, 0.6, 0.2), 0.0);
world.add(make_shared<sphere>(point3(0.0, -100.5, -1.0), 100.0, material_ground));
world.add(make_shared<sphere>(point3(0.0, 0.0, -1.0), 0.5, material_center));
world.add(make_shared<sphere>(point3(-1.0, 0.0, -1.0), 0.5, material_left));
world.add(make_shared<sphere>(point3(-1.0, 0.0, -1.0), -0.45, material_left));
world.add(make_shared<sphere>(point3(1.0, 0.0, -1.0), 0.5, material_right));
// Camera
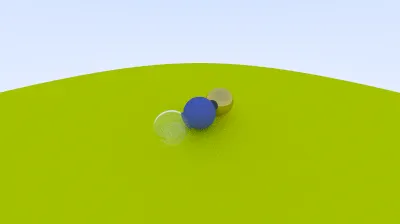
camera cam(point3(-2, 2, 1), point3(0, 0, -1), vec3(0, 1, 0), 90.0, aspect_ratio);
// Render
std::cout << "P3\n" << image_width << ' ' << image_height << "\n255\n";
for (int j = image_height - 1; j >= 0; --j)
{
std::cerr << "\rScanlines Remaining: " << j << ' ' << std::flush;
for (int i = 0; i < image_width; ++i)
{
color pixel_color(0, 0, 0);
for (int s = 0; s < samples_per_pixel; ++s)
{
auto u = (i + random_double()) / (image_width - 1);
auto v = (j + random_double()) / (image_height - 1);
ray r = cam.get_ray(u, v);
pixel_color += ray_color(r, world, max_depth);
}
write_color(std::cout, pixel_color, samples_per_pixel);
}
}
std::cerr << "\nDone.\n";
return (0);
}
C++
복사

수정된 코드를 실행해보면 아래 그림과 같이 원거리 시점으로 world를 볼 수 있다.
위 결과는 Rotation을 적용한 결과인데, 작성해뒀던 확대 및 축소를 나타내고 싶다면 FOV로 들어가는 인자만 조정하면 된다. FOV만 수정된 main.cpp는 아래와 같다.
#include "rtweekend.h"
#include "color.h"
#include "hittable_list.h"
#include "sphere.h"
#include "camera.h"
#include "vec3.h"
#include "material.h"
#include <iostream>
color ray_color(const ray& r, const hittable& world, int depth)
{
hit_record rec;
// If we've exceeded the ray bound limit, no more light is gathered.
if (depth <= 0)
return (color(0, 0, 0));
if (world.hit(r, 0.001, infinity, rec))
{
ray scattered;
color attenuation;
if (rec.mat_ptr->scatter(r, rec, attenuation, scattered))
return (attenuation * ray_color(scattered, world, depth - 1));
return (color(0, 0, 0));
}
vec3 unit_direction = unit_vector(r.direction());
auto t = 0.5 * (unit_direction.y() + 1.0);
return (1.0 - t) * color(1.0, 1.0, 1.0) + t * color(0.5, 0.7, 1.0);
}
int main(void)
{
// Image
const auto aspect_ratio = 16.0 / 9.0;
const int image_width = 400;
const int image_height = static_cast<int>(image_width / aspect_ratio);
const int samples_per_pixel = 100;
const int max_depth = 50;
// World
hittable_list world;
auto material_ground = make_shared<lambertian>(color(0.8, 0.8, 0.0));
auto material_center = make_shared<lambertian>(color(0.1, 0.2, 0.5));
auto material_left = make_shared<dielectric>(1.5);
auto material_right = make_shared<metal>(color(0.8, 0.6, 0.2), 0.0);
world.add(make_shared<sphere>(point3(0.0, -100.5, -1.0), 100.0, material_ground));
world.add(make_shared<sphere>(point3(0.0, 0.0, -1.0), 0.5, material_center));
world.add(make_shared<sphere>(point3(-1.0, 0.0, -1.0), 0.5, material_left));
world.add(make_shared<sphere>(point3(-1.0, 0.0, -1.0), -0.45, material_left));
world.add(make_shared<sphere>(point3(1.0, 0.0, -1.0), 0.5, material_right));
// Camera
camera cam(point3(-2, 2, 1), point3(0, 0, -1), vec3(0, 1, 0), 20.0, aspect_ratio);
// Render
std::cout << "P3\n" << image_width << ' ' << image_height << "\n255\n";
for (int j = image_height - 1; j >= 0; --j)
{
std::cerr << "\rScanlines Remaining: " << j << ' ' << std::flush;
for (int i = 0; i < image_width; ++i)
{
color pixel_color(0, 0, 0);
for (int s = 0; s < samples_per_pixel; ++s)
{
auto u = (i + random_double()) / (image_width - 1);
auto v = (j + random_double()) / (image_height - 1);
ray r = cam.get_ray(u, v);
pixel_color += ray_color(r, world, max_depth);
}
write_color(std::cout, pixel_color, samples_per_pixel);
}
}
std::cerr << "\nDone.\n";
return (0);
}
C++
복사

실행해보면 이전 결과와 달리 확대된 결과를 얻을 수 있다.