


물, 유리, 다이아몬드와 같이 투명한 material로 만들어진 Object들을 Dielectrics (유전체)라고 한다. ray가 유전체에 닿게 되면, 반사광과 굴절광으로 나뉘게 된다. 우리는 ray가 Object에 닿았을 때의 상호작용으로 반사광 혹은 굴절광 중 무작위로 하나만 선택하게 두고 유전체에 대한 ray를 처리할 것이다.
1. Refraction
구현 후 디버깅에 있어서 가장 난해한 것이 굴절광이다. 디버깅이 수훨하도록 반사광을 같이 섞지 않고 오로지 굴절광에 대해서만 먼저 구현하겠다. (ray에 대해서 반사 없이 모두 굴절시킨다.)
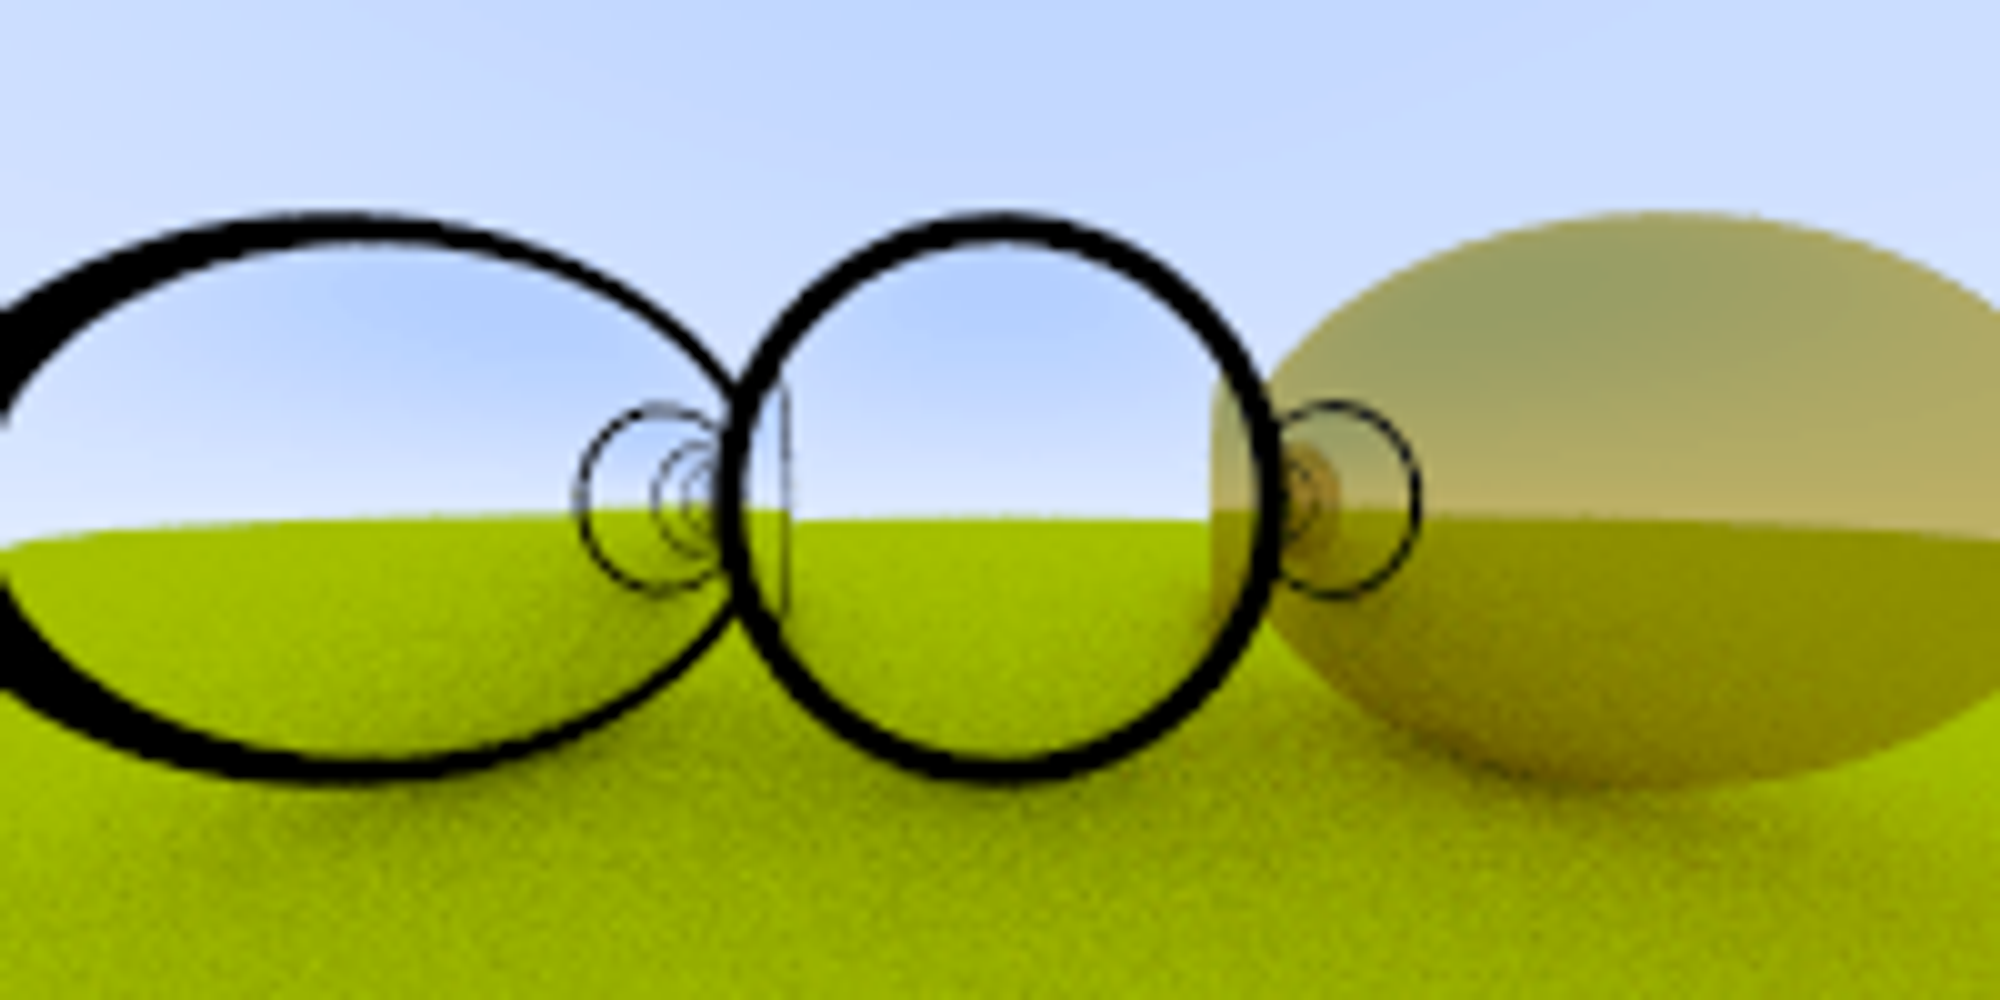
굴절광 구현에 앞 서, 2개의 유리공이 있다고 해보자. 위 그림에서 나타난 유리공이 올바른 모습일까? 위 그림에서의 유리공은 사물이 너무 올바르게 보인다. 실생활의 유리공은 사뭇 이상하게 비친다. 비치는 세상이 거꾸로 보여야 하고, 그림에서 보이는 검은 선 같은게 없어야 한다. 위 그림은 ray가 굴절광 없이 처리하여 나타난 결과이다. 굴절광을 적용했을 때는 어떤식의 Image를 얻게되는지 구현해보며 알아보자.
2. Snell's Law
굴절은 Snell's Law에 의해 설명되는데, 그 공식은 아래와 같다.
와 은 Normal과 이루는 각도이고, 와 (에타와 에타 프라임이라고 읽는다.)는 굴절률을 의미한다. 일반적으로 공기가 1.0, 유리가 1.3 ~ 1.7, 다이아몬드가 2.4의 굴절률을 갖는다. 이에 대해 그림으로 살펴보면 아래와 같다.
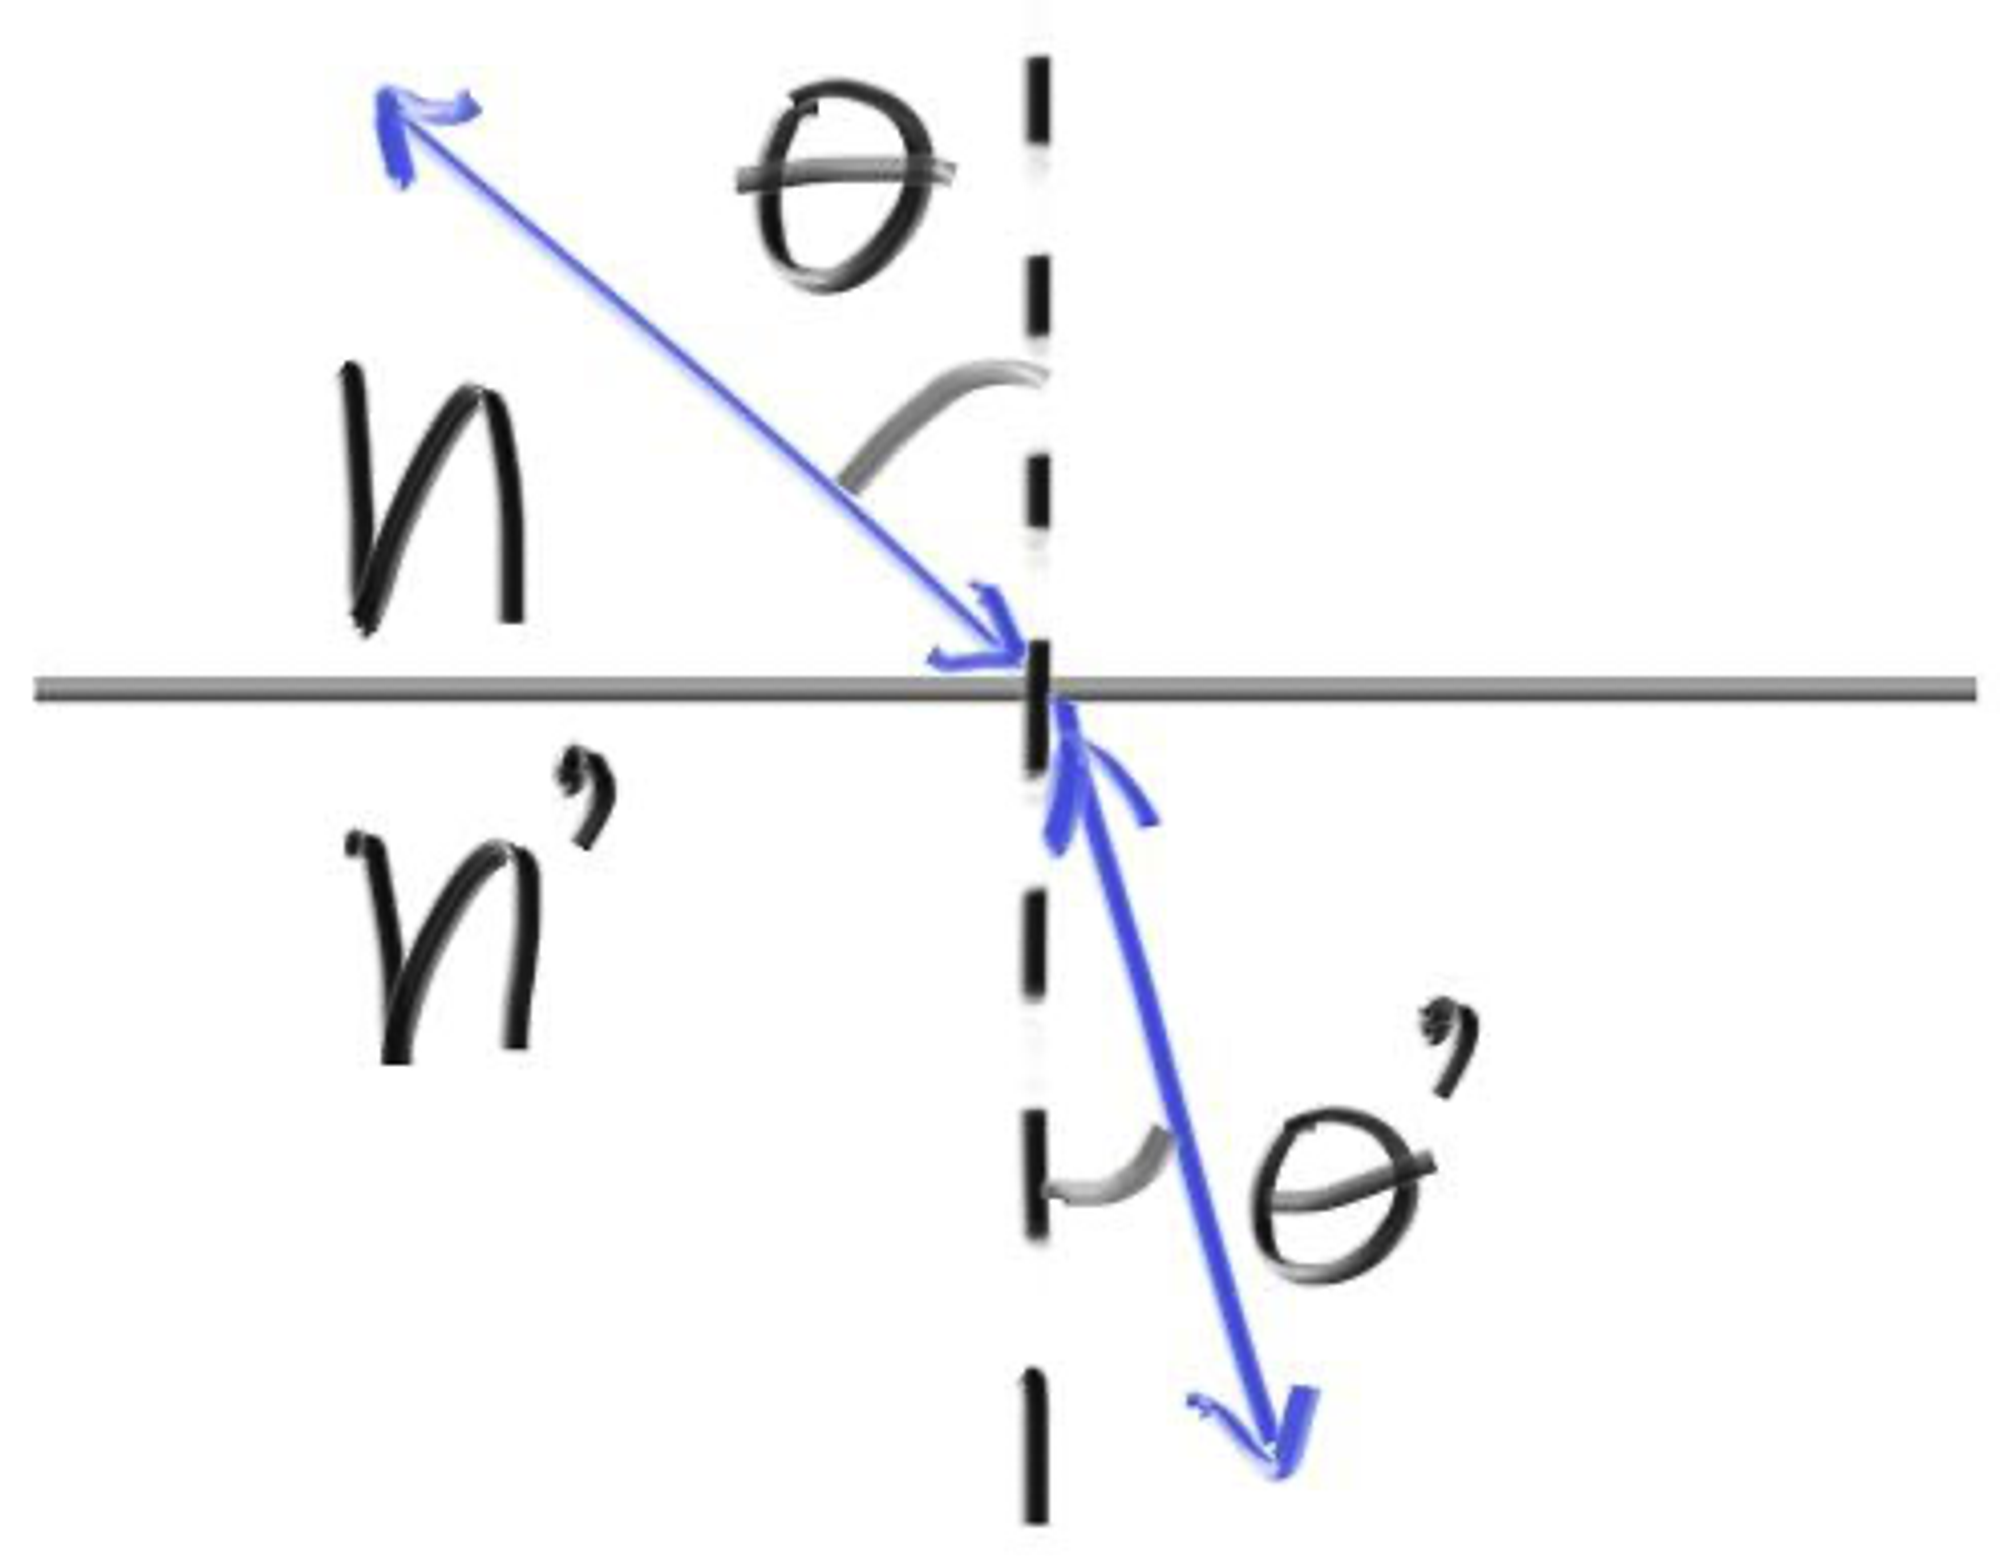
굴절된 ray의 방향을 알기 위해선 주어진 식을 에 대해서 풀어낸 식을 이용해야 한다. 로 풀어낸 식은 아래와 같다.
입사각으로 들어온 ray를 이라 하고 굴절각으로 나가는 ray를 라고 했을 때, 굴절각 쪽의 표면으로 본 Normal을 이라 하자. 우리는 이라는 ray를 에 수직인 ray와 에 평행인 ray로 나눌 수 있다.
을 로 나누면서, 각각을 굴절을 나타낸 Snell's Law를 이용하여 풀어낼 수 있다.
굴절된 ray인 을 와 로 나누었고, 이를 위와 같이 정의한 것에 대해 직접 증명을 해보는 것도 좋겠지만 상당히 어려운 증명이기 때문에 이를 그저 받아들이고 넘어가도 무방하다. 여기까지 진행을 했다면, 의 를 정리하는 과정이 필요하다. 가 쓰이는 Dot Product을 이용하면 편하다.
(When , are Unit Vector)
이에 따라 을 아래와 같이 바꿀 수 있다.
굴절을 처리하기 위해 굴절광인 를 수직 및 평행 Vector로 나누었고, 각 Vector를 Snell's Law에 따라 풀어냈다. 그리고 마무리로써 우리가 ray를 처리할 때 이미 알고 있는 정보들로 치환하여 를 나타내게 되었다. 이를 곧 vec3.h에 refract 함수로 작성하면 아래와 같다.
#ifndef VEC3_H
# define VEC3_H
# include "rtweekend.h"
# include <cmath>
# include <iostream>
using std::sqrt;
class vec3
{
public:
vec3() : e{0,0,0} {}
vec3(double e0, double e1, double e2) : e{e0, e1, e2} {}
double x() const { return e[0]; }
double y() const { return e[1]; }
double z() const { return e[2]; }
vec3 operator-() const { return vec3(-e[0], -e[1], -e[2]); }
double operator[](int i) const { return e[i]; }
double& operator[](int i) { return e[i]; }
vec3& operator+=(const vec3 &v)
{
e[0] += v.e[0];
e[1] += v.e[1];
e[2] += v.e[2];
return *this;
}
vec3& operator*=(const double t)
{
e[0] *= t;
e[1] *= t;
e[2] *= t;
return *this;
}
vec3& operator/=(const double t)
{
return *this *= 1/t;
}
double length() const
{
return sqrt(length_squared());
}
double length_squared() const
{
return e[0]*e[0] + e[1]*e[1] + e[2]*e[2];
}
bool near_zero() const
{
// Return true if the vector is close to zero in all dimensions.
const auto s = 1e-8;
return ((fabs(e[0]) < s) && (fabs(e[1]) < s) && (fabs(e[2]) < s));
}
inline static vec3 random()
{
return (vec3(random_double(), random_double(), random_double()));
}
inline static vec3 random(double min, double max)
{
return (vec3(random_double(min, max), random_double(min, max), random_double(min, max)));
}
public:
double e[3];
};
// Type aliases for vec3
using point3 = vec3; // 3D point
using color = vec3; // RGB color
// vec3 Utility Functions
inline std::ostream& operator<<(std::ostream &out, const vec3 &v)
{
return out << v.e[0] << ' ' << v.e[1] << ' ' << v.e[2];
}
inline vec3 operator+(const vec3 &u, const vec3 &v)
{
return vec3(u.e[0] + v.e[0], u.e[1] + v.e[1], u.e[2] + v.e[2]);
}
inline vec3 operator-(const vec3 &u, const vec3 &v)
{
return vec3(u.e[0] - v.e[0], u.e[1] - v.e[1], u.e[2] - v.e[2]);
}
inline vec3 operator*(const vec3 &u, const vec3 &v)
{
return vec3(u.e[0] * v.e[0], u.e[1] * v.e[1], u.e[2] * v.e[2]);
}
inline vec3 operator*(double t, const vec3 &v)
{
return vec3(t*v.e[0], t*v.e[1], t*v.e[2]);
}
inline vec3 operator*(const vec3 &v, double t)
{
return t * v;
}
inline vec3 operator/(vec3 v, double t)
{
return (1/t) * v;
}
inline double dot(const vec3 &u, const vec3 &v)
{
return u.e[0] * v.e[0]
+ u.e[1] * v.e[1]
+ u.e[2] * v.e[2];
}
inline vec3 cross(const vec3 &u, const vec3 &v)
{
return vec3(u.e[1] * v.e[2] - u.e[2] * v.e[1],
u.e[2] * v.e[0] - u.e[0] * v.e[2],
u.e[0] * v.e[1] - u.e[1] * v.e[0]);
}
inline vec3 unit_vector(vec3 v)
{
return v / v.length();
}
inline vec3 random_in_unit_sphere()
{
while (true)
{
auto p = vec3::random(-1, 1);
if (p.length_squared() >= 1)
continue;
return (p);
}
}
vec3 random_unit_vector()
{
return (unit_vector(random_in_unit_sphere()));
}
vec3 random_in_hemisphere(const vec3& normal)
{
vec3 in_unit_sphere = random_in_unit_sphere();
if (dot(in_unit_sphere, normal) > 0.0) // In the same hemisphere as the normal
return (in_unit_sphere);
return (-in_unit_sphere);
}
vec3 reflect(const vec3& v, const vec3& n)
{
return (v - 2 * dot(v, n) * n);
}
vec3 refract(const vec3& uv, const vec3& n, double etai_over_etat)
{
auto cos_theta = fmin(dot(-uv,n), 1.0);
vec3 r_out_perp = etai_over_etat * (uv + cos_theta * n);
vec3 r_out_parallel = -sqrt(fabs(1.0 - r_out_perp.length_squared())) * n;
return (r_out_perp + r_out_parallel);
}
#endif
C++
복사
위 refract 함수를 이용하여, material.h에 dielectric이라는 Class를 만들면 아래와 같다.
#ifndef MATERIAL_H
# define MATERIAL_H
# include "rtweekend.h"
# include "vec3.h"
struct hit_record;
class material
{
public:
virtual bool scatter(const ray& r_in, const hit_record& rec, color& attenuation, ray& scattered) const = 0;
};
class lambertian : public material
{
public:
lambertian(const color& a) : albedo(a) {}
virtual ~lambertian() {}
virtual bool scatter(const ray& r_in, const hit_record& rec, color& attenuation, ray& scattered) const override
{
auto nothing = r_in.direction();
unit_vector(nothing);
auto scatter_direction = rec.normal + random_unit_vector();
if (scatter_direction.near_zero())
scatter_direction = rec.normal;
scattered = ray(rec.p, scatter_direction);
attenuation = albedo;
return (true);
}
public:
color albedo;
};
class metal : public material
{
public:
metal(const color &a, double f) : albedo(a), fuzz(f < 1 ? f : 1) {}
virtual ~metal() {}
virtual bool scatter(const ray& r_in, const hit_record& rec, color& attenuation, ray& scattered) const override
{
vec3 reflected = reflect(unit_vector(r_in.direction()), rec.normal);
scattered = ray(rec.p, reflected + fuzz * random_in_unit_sphere());
attenuation = albedo;
return (dot(scattered.direction(), rec.normal) > 0);
}
public:
color albedo;
double fuzz;
};
class dielectric : public material
{
public:
dielectric(double index_of_refraction) : ir(index_of_refraction) {}
virtual ~dielectric() {}
virtual bool scatter(const ray& r_in, const hit_record& rec, color& attenuation, ray& scattered) const override
{
attenuation = color(1.0, 1.0, 1.0);
double refraction_ratio = rec.front_face ? (1.0 / ir) : ir;
vec3 unit_direction = unit_vector(r_in.direction());
vec3 refracted = refract(unit_direction, rec.normal, refraction_ratio);
scattered = ray(rec.p, refracted);
return (true);
}
public:
double ir;
};
#endif
C++
복사
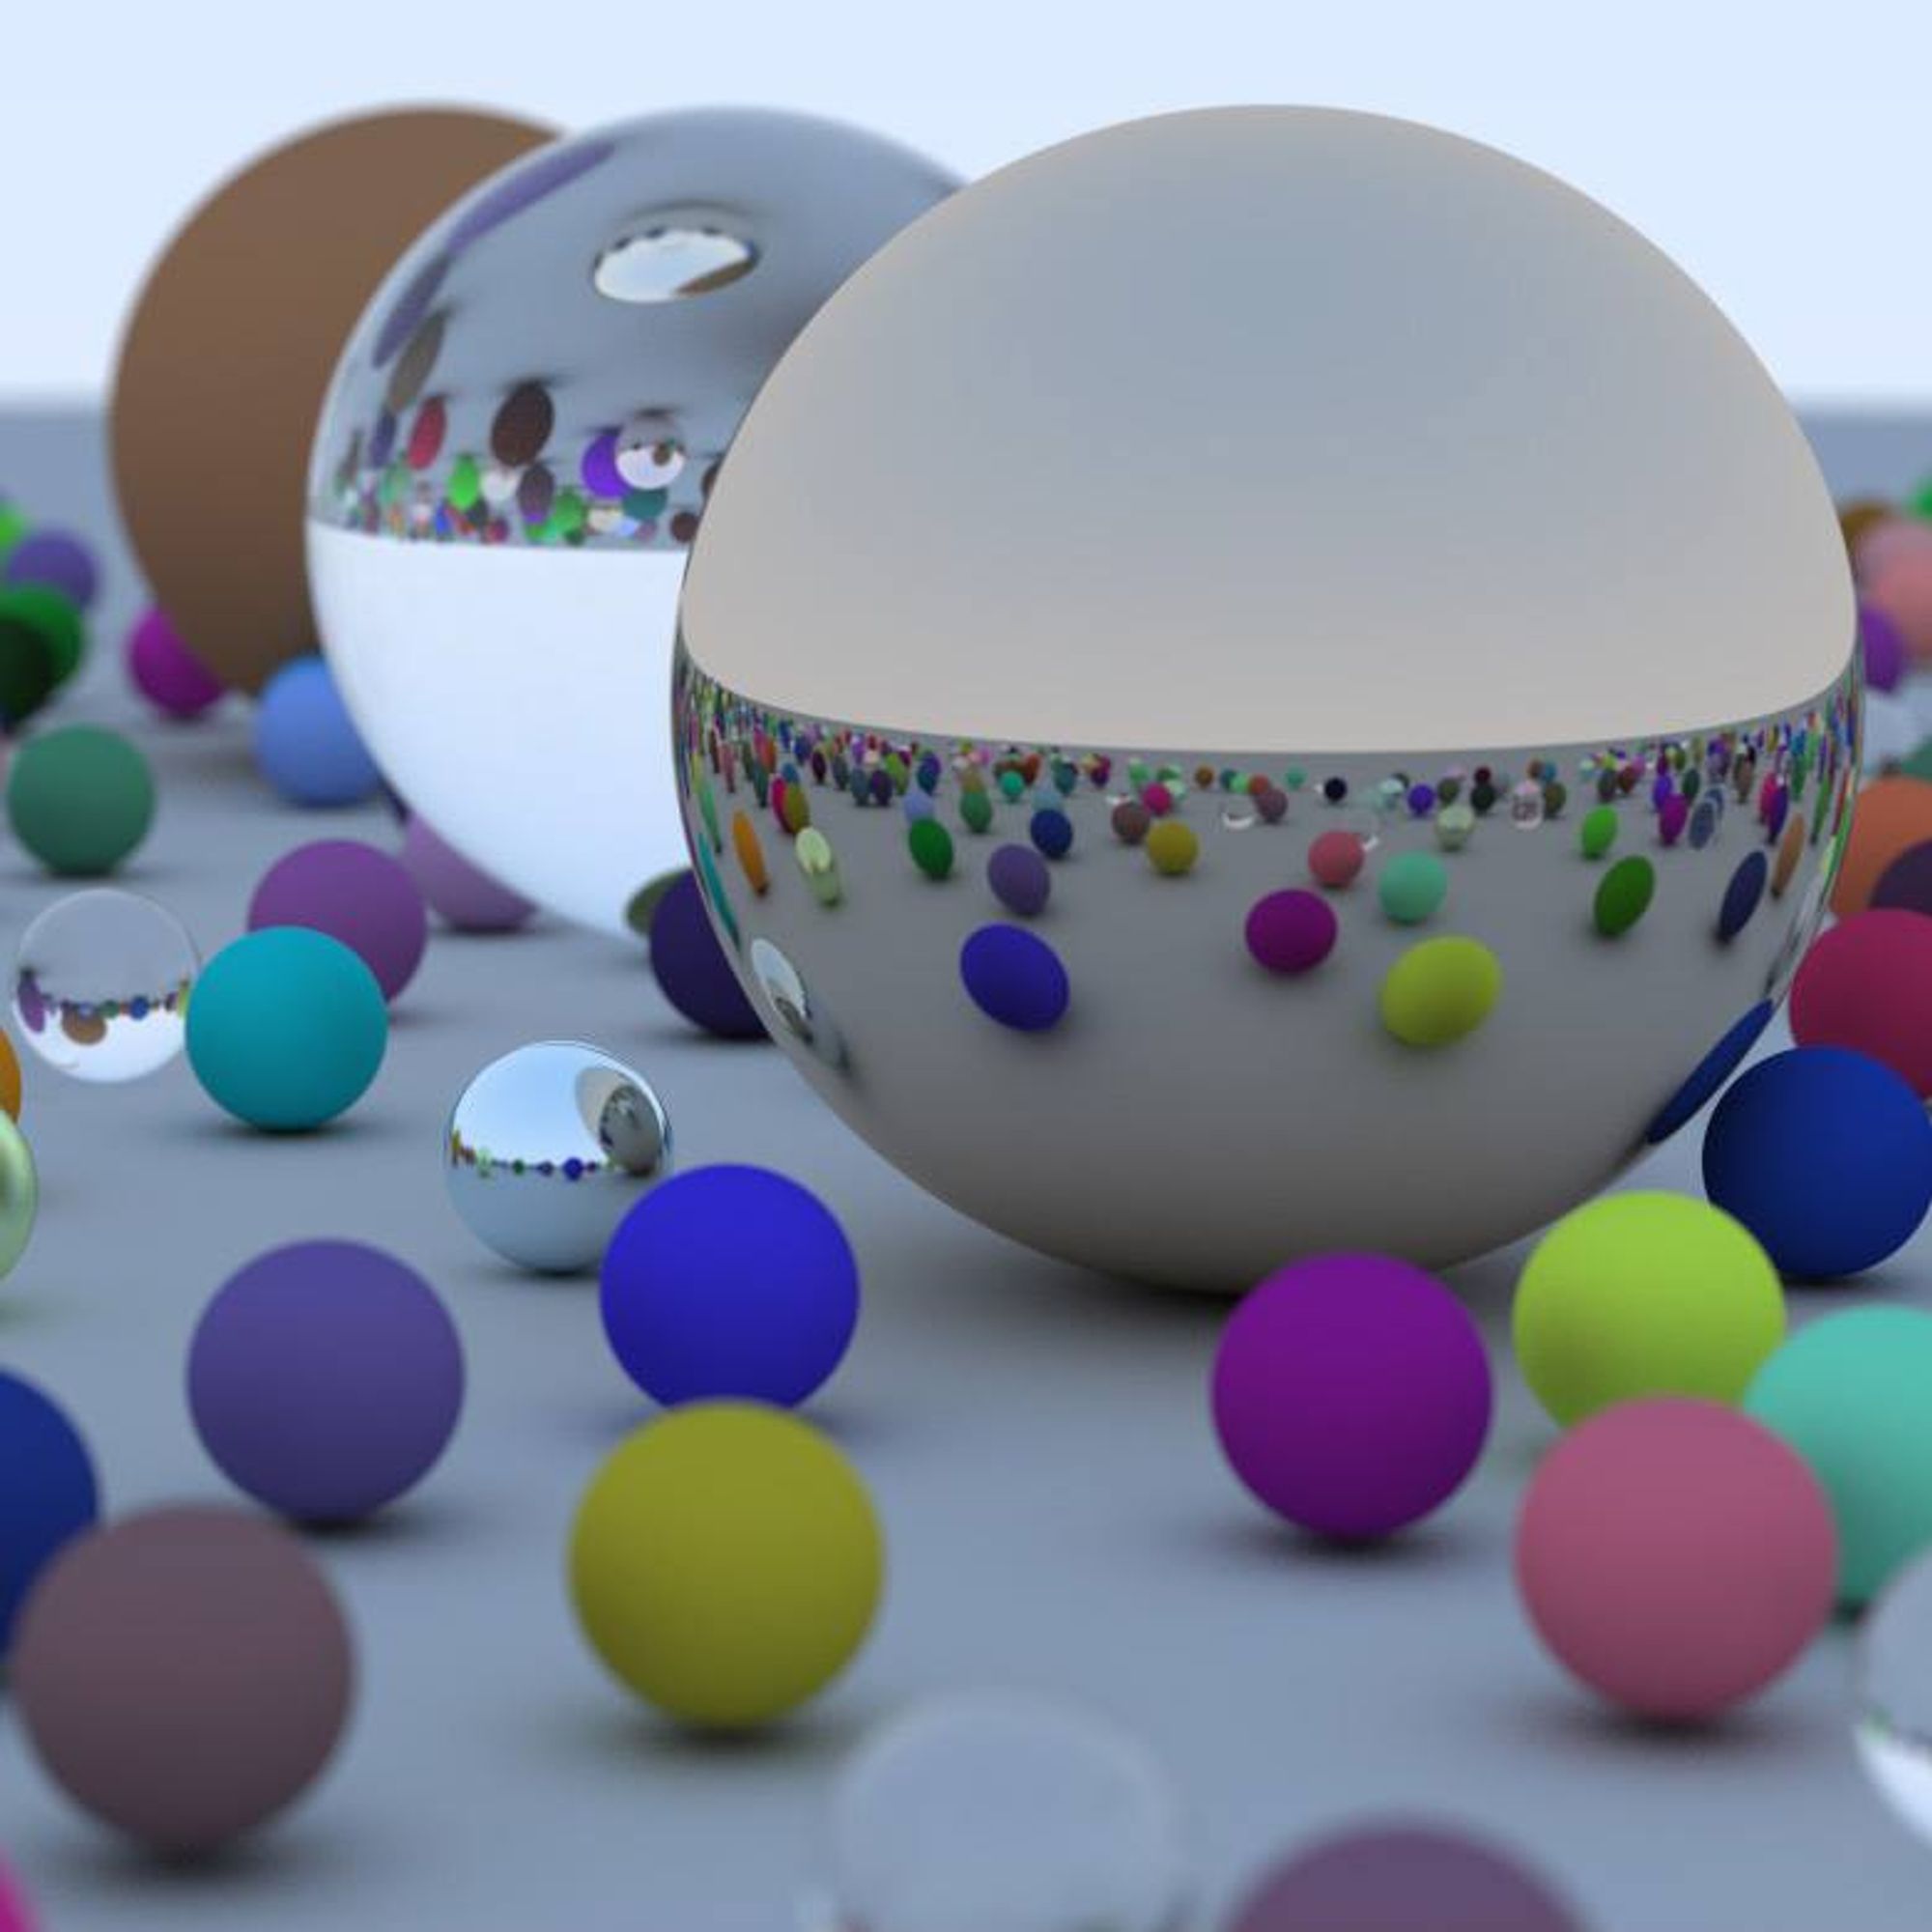
main.cpp의 world에서 좌측과 중앙 Object를 deletric이라는 material로 만들어보자. 코드는 아래와 같다.
#include "rtweekend.h"
#include "color.h"
#include "hittable_list.h"
#include "sphere.h"
#include "camera.h"
#include "vec3.h"
#include "material.h"
#include <iostream>
color ray_color(const ray& r, const hittable& world, int depth)
{
hit_record rec;
// If we've exceeded the ray bound limit, no more light is gathered.
if (depth <= 0)
return (color(0, 0, 0));
if (world.hit(r, 0.001, infinity, rec))
{
ray scattered;
color attenuation;
if (rec.mat_ptr->scatter(r, rec, attenuation, scattered))
return (attenuation * ray_color(scattered, world, depth - 1));
return (color(0, 0, 0));
}
vec3 unit_direction = unit_vector(r.direction());
auto t = 0.5 * (unit_direction.y() + 1.0);
return (1.0 - t) * color(1.0, 1.0, 1.0) + t * color(0.5, 0.7, 1.0);
}
int main(void)
{
// Image
const auto aspect_ratio = 16.0 / 9.0;
const int image_width = 400;
const int image_height = static_cast<int>(image_width / aspect_ratio);
const int samples_per_pixel = 100;
const int max_depth = 50;
// World
hittable_list world;
auto material_ground = make_shared<lambertian>(color(0.8, 0.8, 0.0));
auto material_center = make_shared<dielectric>(1.5);
auto material_left = make_shared<dielectric>(1.5);
auto material_right = make_shared<metal>(color(0.8, 0.6, 0.2), 1.0);
world.add(make_shared<sphere>(point3(0.0, -100.5, -1.0), 100.0, material_ground));
world.add(make_shared<sphere>(point3(0.0, 0.0, -1.0), 0.5, material_center));
world.add(make_shared<sphere>(point3(-1.0, 0.0, -1.0), 0.5, material_left));
world.add(make_shared<sphere>(point3(1.0, 0.0, -1.0), 0.5, material_right));
// Camera
camera cam;
// Render
std::cout << "P3\n" << image_width << ' ' << image_height << "\n255\n";
for (int j = image_height - 1; j >= 0; --j)
{
std::cerr << "\rScanlines Remaining: " << j << ' ' << std::flush;
for (int i = 0; i < image_width; ++i)
{
color pixel_color(0, 0, 0);
for (int s = 0; s < samples_per_pixel; ++s)
{
auto u = (i + random_double()) / (image_width - 1);
auto v = (j + random_double()) / (image_height - 1);
ray r = cam.get_ray(u, v);
pixel_color += ray_color(r, world, max_depth);
}
write_color(std::cout, pixel_color, samples_per_pixel);
}
}
std::cerr << "\nDone.\n";
return (0);
}
C++
복사

이번 Chapter 초기에 Image에는 굴절 없이 나타난 ray를 이용하여 상이 거꾸로 맺히지도 않았고 검은색의 선이 Object 주변에 있었지만, 이번엔 굴절이 잘 반영된 것을 확인할 수 있다.

3. Total Internal Reflection
출력된 Image를 보면 굴절이 잘 구현이 되긴 했으나 여전히 문제되는 부분들이 있다. 바로 아주 높은 굴절률을 나타내려 했을 때이다. 실생활에서 Snell's Law에서는 이 경우에 답이 존재하지 않는다. (즉, 굴절이 가능하지 않은 것이다.) Snell's Law에서의 을 다시 살펴보자.
만약 ray가 유리로 이뤄진 Object를 투과하려 하고 Object의 밖이 공기라면 이 때의 와 은 각각 와 이 된다.
따라서 주어진 수식이 아래와 같이 적용된다. (material.h의 dielectric을 정의했을 때, refraction_ratio를 구하는데 있어서 ir 값을 역수를 취할지 말지 정했던 것이 위의 와 을 이용해 어디서 어디로 투과되는지를 결정하는 것이었음을 유추할 수 있다.)
은 보다 커질 수 없기 때문에, 는 보다 클 수 없다는 것이다. 이 경우에 대해서 Snell's Law의 양변에 대해서 등호가 성립되지 않고, 근이 존재하지 않는 것으로 이어진다. 이는 곧 굴절이 이뤄지지 않음을 의미하기에 적절한 처리가 필요하다.
굴절이 불가능한 경우에는 내부에서 모든 ray에 대해 반사가 이뤄진다. 이를 곧 Total Internal Reflection (전체 내부 반사)라고 한다. 물과 공기의 경계면이 거울과 같은 역할을 이유가 곧 전체 내부 반사 때문이다. 전체 내부 반사가 일어나는 경우는 유전체가 굴절이 불가능한 경우였고, 이에 대한 판별을 Snell's Law의 을 통해서 했기 때문에 를 삼각 함수로 풀어낼 것이다.
를 풀어낸 식에서 우리는 이미 가 과 같다는 것을 알고 있기 때문에 코드로 표현하는데 있어서 문제가 되지 않는다. 이를 반영한 material.h의 dielectric은 다음과 같다.
#ifndef MATERIAL_H
# define MATERIAL_H
# include "rtweekend.h"
# include "vec3.h"
struct hit_record;
class material
{
public:
virtual bool scatter(const ray& r_in, const hit_record& rec, color& attenuation, ray& scattered) const = 0;
};
class lambertian : public material
{
public:
lambertian(const color& a) : albedo(a) {}
virtual ~lambertian() {}
virtual bool scatter(const ray& r_in, const hit_record& rec, color& attenuation, ray& scattered) const override
{
auto nothing = r_in.direction();
unit_vector(nothing);
auto scatter_direction = rec.normal + random_unit_vector();
if (scatter_direction.near_zero())
scatter_direction = rec.normal;
scattered = ray(rec.p, scatter_direction);
attenuation = albedo;
return (true);
}
public:
color albedo;
};
class metal : public material
{
public:
metal(const color &a, double f) : albedo(a), fuzz(f < 1 ? f : 1) {}
virtual ~metal() {}
virtual bool scatter(const ray& r_in, const hit_record& rec, color& attenuation, ray& scattered) const override
{
vec3 reflected = reflect(unit_vector(r_in.direction()), rec.normal);
scattered = ray(rec.p, reflected + fuzz * random_in_unit_sphere());
attenuation = albedo;
return (dot(scattered.direction(), rec.normal) > 0);
}
public:
color albedo;
double fuzz;
};
class dielectric : public material
{
public:
dielectric(double index_of_refraction) : ir(index_of_refraction) {}
virtual ~dielectric() {}
virtual bool scatter(const ray& r_in, const hit_record& rec, color& attenuation, ray& scattered) const override
{
attenuation = color(1.0, 1.0, 1.0);
double refraction_ratio = rec.front_face ? (1.0 / ir) : ir;
vec3 unit_direction = unit_vector(r_in.direction());
double cos_theta = fmin(dot(-unit_direction, rec.normal), 1.0);
double sin_theta = sqrt(1.0 - cos_theta * cos_theta);
bool cannot_refract = refraction_ratio * sin_theta > 1.0;
vec3 direction;
if (cannot_refract)
direction = reflect(unit_direction, rec.normal);
else
direction = refract(unit_direction, rec.normal, refraction_ratio);
scattered = ray(rec.p, direction);
return (true);
}
public:
double ir;
};
#endif
C++
복사
유전체 material에 대한 구현이 끝났기 때문에 dielectric, lambertian, metal을 각각 world에 나타내도록 main.cpp도 수정해보자.
#include "rtweekend.h"
#include "color.h"
#include "hittable_list.h"
#include "sphere.h"
#include "camera.h"
#include "vec3.h"
#include "material.h"
#include <iostream>
color ray_color(const ray& r, const hittable& world, int depth)
{
hit_record rec;
// If we've exceeded the ray bound limit, no more light is gathered.
if (depth <= 0)
return (color(0, 0, 0));
if (world.hit(r, 0.001, infinity, rec))
{
ray scattered;
color attenuation;
if (rec.mat_ptr->scatter(r, rec, attenuation, scattered))
return (attenuation * ray_color(scattered, world, depth - 1));
return (color(0, 0, 0));
}
vec3 unit_direction = unit_vector(r.direction());
auto t = 0.5 * (unit_direction.y() + 1.0);
return (1.0 - t) * color(1.0, 1.0, 1.0) + t * color(0.5, 0.7, 1.0);
}
int main(void)
{
// Image
const auto aspect_ratio = 16.0 / 9.0;
const int image_width = 400;
const int image_height = static_cast<int>(image_width / aspect_ratio);
const int samples_per_pixel = 100;
const int max_depth = 50;
// World
hittable_list world;
auto material_ground = make_shared<lambertian>(color(0.8, 0.8, 0.0));
auto material_center = make_shared<lambertian>(color(0.1, 0.2, 0.5));
auto material_left = make_shared<dielectric>(1.5);
auto material_right = make_shared<metal>(color(0.8, 0.6, 0.2), 0.0);
world.add(make_shared<sphere>(point3(0.0, -100.5, -1.0), 100.0, material_ground));
world.add(make_shared<sphere>(point3(0.0, 0.0, -1.0), 0.5, material_center));
world.add(make_shared<sphere>(point3(-1.0, 0.0, -1.0), 0.5, material_left));
world.add(make_shared<sphere>(point3(1.0, 0.0, -1.0), 0.5, material_right));
// Camera
camera cam;
// Render
std::cout << "P3\n" << image_width << ' ' << image_height << "\n255\n";
for (int j = image_height - 1; j >= 0; --j)
{
std::cerr << "\rScanlines Remaining: " << j << ' ' << std::flush;
for (int i = 0; i < image_width; ++i)
{
color pixel_color(0, 0, 0);
for (int s = 0; s < samples_per_pixel; ++s)
{
auto u = (i + random_double()) / (image_width - 1);
auto v = (j + random_double()) / (image_height - 1);
ray r = cam.get_ray(u, v);
pixel_color += ray_color(r, world, max_depth);
}
write_color(std::cout, pixel_color, samples_per_pixel);
}
}
std::cerr << "\nDone.\n";
return (0);
}
C++
복사

수정한 코드를 실행 해보면 큰 변화를 볼 수는 없지만, 오류가 생길 수 있는 상황에 대해서는 크게 걱정할 필요가 없어졌다. 참고로 유리와 같은 유전체의 표면은 ray를 흡수하지 않기 때문에 Attenuation (감쇄) 색상은 항상 이 된다.
4. Schlick Approximation
실제 유리를 보는 각도에 따라 나타나는 반사율을 고려해보자. 예를 들어 가파른 각을 둔채로 있는 유리창을 생각해보자. 우리는 이 유리창을 보았을 때 거의 거울과 다름 없는 것을 볼 수 있다. 이를 나타내는 굉장히 지저분한 방정식이 있지만, 우리는 연산이 꽤 가벼우면서도 정확한 Christophe Schlick의 다항식을 이용하여 근사할 것이다. 따라서 Full-Glass와 같은 유전체에 대해서 이전보다 정확한 표현이 가능하다. 수정된 material.h는 아래와 같다.
#ifndef MATERIAL_H
# define MATERIAL_H
# include "rtweekend.h"
# include "vec3.h"
struct hit_record;
class material
{
public:
virtual bool scatter(const ray& r_in, const hit_record& rec, color& attenuation, ray& scattered) const = 0;
};
class lambertian : public material
{
public:
lambertian(const color& a) : albedo(a) {}
virtual ~lambertian() {}
virtual bool scatter(const ray& r_in, const hit_record& rec, color& attenuation, ray& scattered) const override
{
auto nothing = r_in.direction();
unit_vector(nothing);
auto scatter_direction = rec.normal + random_unit_vector();
if (scatter_direction.near_zero())
scatter_direction = rec.normal;
scattered = ray(rec.p, scatter_direction);
attenuation = albedo;
return (true);
}
public:
color albedo;
};
class metal : public material
{
public:
metal(const color &a, double f) : albedo(a), fuzz(f < 1 ? f : 1) {}
virtual ~metal() {}
virtual bool scatter(const ray& r_in, const hit_record& rec, color& attenuation, ray& scattered) const override
{
vec3 reflected = reflect(unit_vector(r_in.direction()), rec.normal);
scattered = ray(rec.p, reflected + fuzz * random_in_unit_sphere());
attenuation = albedo;
return (dot(scattered.direction(), rec.normal) > 0);
}
public:
color albedo;
double fuzz;
};
class dielectric : public material
{
public:
dielectric(double index_of_refraction) : ir(index_of_refraction) {}
virtual ~dielectric() {}
virtual bool scatter(const ray& r_in, const hit_record& rec, color& attenuation, ray& scattered) const override
{
attenuation = color(1.0, 1.0, 1.0);
double refraction_ratio = rec.front_face ? (1.0 / ir) : ir;
vec3 unit_direction = unit_vector(r_in.direction());
double cos_theta = fmin(dot(-unit_direction, rec.normal), 1.0);
double sin_theta = sqrt(1.0 - cos_theta * cos_theta);
bool cannot_refract = refraction_ratio * sin_theta > 1.0;
vec3 direction;
if (cannot_refract || reflectance(cos_theta, refraction_ratio) > random_double())
direction = reflect(unit_direction, rec.normal);
else
direction = refract(unit_direction, rec.normal, refraction_ratio);
scattered = ray(rec.p, direction);
return (true);
}
public:
double ir;
private:
static double reflectance(double cosine, double ref_idx)
{
// Use Schlick's approximation for reflectance.
auto r0 = (1 - ref_idx) / (1 + ref_idx);
r0 = r0 * r0;
return (r0 + (1 - r0) * pow((1 - cosine), 5));
}
};
#endif
C++
복사
5. Modeling a Hollow Glass Sphere
투명한 유리를 표현하기 위해선 어떻게 해야할까? 정말 흥미로운 사실은 추가적인 코드 없이 기존의 코드만으로 가능하다는 것이다. 약간의 속임수인데, 반지름 값을 음수로 사용하면 된다. Object 표면에 대한 Normal 값이 Object의 내부를 향한다는 점만 주의하면 되는데, 내부적으로 Normal이 내부를 향하면 밖을 향하도록 작성했었기 때문에 공간 상에서 별 다른 영향을 끼치지는 않는다. 아래의 main.cpp를 살펴보자.
#include "rtweekend.h"
#include "color.h"
#include "hittable_list.h"
#include "sphere.h"
#include "camera.h"
#include "vec3.h"
#include "material.h"
#include <iostream>
color ray_color(const ray& r, const hittable& world, int depth)
{
hit_record rec;
// If we've exceeded the ray bound limit, no more light is gathered.
if (depth <= 0)
return (color(0, 0, 0));
if (world.hit(r, 0.001, infinity, rec))
{
ray scattered;
color attenuation;
if (rec.mat_ptr->scatter(r, rec, attenuation, scattered))
return (attenuation * ray_color(scattered, world, depth - 1));
return (color(0, 0, 0));
}
vec3 unit_direction = unit_vector(r.direction());
auto t = 0.5 * (unit_direction.y() + 1.0);
return (1.0 - t) * color(1.0, 1.0, 1.0) + t * color(0.5, 0.7, 1.0);
}
int main(void)
{
// Image
const auto aspect_ratio = 16.0 / 9.0;
const int image_width = 400;
const int image_height = static_cast<int>(image_width / aspect_ratio);
const int samples_per_pixel = 100;
const int max_depth = 50;
// World
hittable_list world;
auto material_ground = make_shared<lambertian>(color(0.8, 0.8, 0.0));
auto material_center = make_shared<lambertian>(color(0.1, 0.2, 0.5));
auto material_left = make_shared<dielectric>(1.5);
auto material_right = make_shared<metal>(color(0.8, 0.6, 0.2), 0.0);
world.add(make_shared<sphere>(point3(0.0, -100.5, -1.0), 100.0, material_ground));
world.add(make_shared<sphere>(point3(0.0, 0.0, -1.0), 0.5, material_center));
world.add(make_shared<sphere>(point3(-1.0, 0.0, -1.0), 0.5, material_left));
world.add(make_shared<sphere>(point3(-1.0, 0.0, -1.0), -0.4, material_left));
world.add(make_shared<sphere>(point3(1.0, 0.0, -1.0), 0.5, material_right));
// Camera
camera cam;
// Render
std::cout << "P3\n" << image_width << ' ' << image_height << "\n255\n";
for (int j = image_height - 1; j >= 0; --j)
{
std::cerr << "\rScanlines Remaining: " << j << ' ' << std::flush;
for (int i = 0; i < image_width; ++i)
{
color pixel_color(0, 0, 0);
for (int s = 0; s < samples_per_pixel; ++s)
{
auto u = (i + random_double()) / (image_width - 1);
auto v = (j + random_double()) / (image_height - 1);
ray r = cam.get_ray(u, v);
pixel_color += ray_color(r, world, max_depth);
}
write_color(std::cout, pixel_color, samples_per_pixel);
}
}
std::cerr << "\nDone.\n";
return (0);
}
C++
복사

실행해보면 투명한 유리 구체가 유리 구체 내부에 잘 나타난 것을 볼 수 있다.
